The ArduPilot Zephyr HAL — what it is, why it’s worth doing, and how it flies on a BeagleV-Fire today.
Heads up: this work has not been upstreamed yet. Everything below lives on a fork: github.com/marcoantonio-ferrera/ardupilot.

ArduPilot, briefly
ArduPilot is an open-source autopilot. It has been flying things for well over a decade: quadcopters, fixed-wing aircraft, rovers, boats, submarines, blimps. If you have seen a drone survey a field or a small boat autonomously map a lake, ArduPilot was probably doing the work.
The codebase is large, and split in the way you’d expect:
- Per-vehicle firmware (ArduCopter, ArduPlane, ArduRover, ArduSub, Blimp).
- A long list of sensor drivers — IMUs, barometers, magnetometers, GPS, rangefinders.
- EKF2/EKF3 state estimators and the control loops on top of them.
- MAVLink, which is how ground stations like Mission Planner and QGroundControl talk to the vehicle.
The thing that makes ArduPilot portable is the HAL. Platforms like ChibiOS-on-STM32, Linux, and the SITL simulator each have their own AP_HAL_* directory. Vehicle code never pokes a register — it calls into the HAL, and the HAL does the platform-specific work.
What’s new is the ArduPilot Zephyr HAL — a port of that abstraction layer onto the Zephyr RTOS, available here on the fork (currently on a fork — see the note above).
Why Zephyr
Zephyr is a small RTOS under the Linux Foundation. Two things about it are relevant here.
First, it covers a lot of silicon. Arm Cortex-M, RISC-V, Xtensa, ARC — all first-class targets, hundreds of boards supported upstream. No single vendor owns the project, which tends to keep the abstractions honest.
Second, Zephyr’s device model is uniform. One Devicetree describes the board; generic subsystems (uart, i2c, spi, pwm, gpio, adc) hide whatever MCU sits underneath. Code written against those APIs is not written for one vendor’s silicon — it’s written for the class of boards Zephyr runs on.
That second point is the whole reason to do this port. The ArduPilot Zephyr HAL, written against Zephyr’s device model, is a HAL that, in principle, runs everywhere Zephyr runs.
The port
The rule we wrote down at the start: generic HAL code only talks to Zephyr subsystems and Devicetree aliases. Anything silicon-specific — a bug workaround, a custom driver, a funny clock tree — stays in a per-board file. No #ifdef SOC_FOO in the HAL.
Peripherals are wired up through named aliases:
aliases {
    ardupilot-serial0 = &uart2;     /* MAVLink (GCS telemetry)          */
    ardupilot-serial1 = &uart4;     /* GPS                              */
    ardupilot-i2c0    = &i2c0;      /* IMU, baro, mag on a single bus   */
    ardupilot-spi0    = &spi0;      /* High-rate SPI sensors            */
    ardupilot-pwm0    = &pwm0;      /* Servo / ESC outputs              */
    ardupilot-gpio0   = &gpio0;     /* Bank 0 — HAL pins 0-31           */
    ardupilot-rcinput = &uart3;     /* SBUS input (auto-configured)     */
};
If an alias is absent, the corresponding HAL call returns null or does nothing. Nothing assumes hardware it can’t see. Moving a sensor to a different bus is a Devicetree change, not a HAL recompile.
So porting to a new Zephyr-supported board comes down to four files:
- A
hwdef.datthat names the Zephyr board target. - A short overlay mapping
ardupilot-*aliases onto real device nodes. - A
.confKconfig fragment that turns on the subsystems you want. - A
hwdef.hwith the sensor probe list and any board-specific defines.
Everything else — the vehicle code, HAL, and build glue — comes along for free.
First board: BeagleV-Fire
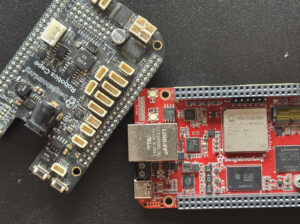
The first target is the BeagleV-Fire. It’s a Microchip PolarFire SoC board with five RISC-V cores (four U54 application harts plus one E51 monitor hart), roughly 250k elements of FPGA fabric, and BeagleBone-compatible cape headers.
For a flight controller this is an unusual mix. The CPU runs the flight code. The fabric generates servo PWM directly, so output jitter is set by silicon rather than an OS scheduler. Sensors — MPU-9250 IMU, BMP280 baro, AK8963 magnetometer — hang off the PolarFire’s MSS I²C bus.
Zephyr sees all of this as ordinary DT nodes. The fabric PWM is a small out-of-tree driver in the HAL (drivers/pwm/pwm_fabric_servo.c) behind the compatible beaglev-fire,fabric-servo-pwm. It’s gated on that compatible appearing in the Devicetree, so it compiles away to nothing on any other board.
Gateware: the ROBOTICS cape build
The fabric PWM driver above only does anything if the FPGA fabric actually exposes those servo channels on the cape headers. On stock BeagleV-Fire gateware it doesn’t — the default bitstream wires the cape pins for general-purpose use, not for ArduPilot’s eight-channel servo output.
For that, use the ROBOTICS-cape variant on this fork of the gateware:
git clone https://openbeagle.org/marco_ferreira/my-lovely-gateware.gitBuild the ROBOTICS target and flash the resulting bitstream to the board before booting Zephyr. This pins out the eight fabric-PWM channels on the cape connector, exposes the SBUS RX line on the UART the HAL expects, and routes the I²C and SPI buses to the sensor positions used by the BeagleV-Fire hwdef. Once that gateware is loaded, the Devicetree aliases on the Zephyr side line up with real signals at the cape and everything described below works end-to-end.
What runs today
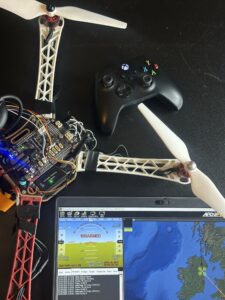
On a BeagleV-Fire running Zephyr on its own (single U54, no Linux):
- ArduCopter boots and enters
ardupilot_entry(). - MAVLink telemetry at 115200 baud over MMUART2, talking to Mission Planner.
- EKF3 state estimation (it’s hungry — 32 MB of heap).
- IMU at 1 kHz, baro and mag at their usual rates.
- Fabric-generated PWM on the servo outputs.
- Parameter storage on a microSD card (FAT32 over SPI).
- Dual-LED status via ArduPilot’s
AP_Notify.
Building it: end-to-end on a BeagleV-Fire
From a stock BeagleV-Fire to a flying ArduCopter is three jobs: get the right gateware on the FPGA, build the ArduPilot firmware, and flash that firmware onto the board. The gateware and flashing steps are largely BeagleBoard.org / Microchip workflows that are well documented elsewhere — links inline below. The ArduPilot build is the part that’s specific to this work, so it gets the long treatment.
Step 1 — Flash the ROBOTICS gateware
The fabric PWM, the SBUS pin, and the I²C/SPI routing on the cape only exist if the FPGA is loaded with the ROBOTICS bitstream. Build it from the fork:
git clone https://openbeagle.org/marco_ferreira/my-lovely-gateware.git
cd my-lovely-gateware
# Follow the README in this repo to build the ROBOTICS target and produce the
# artefacts, then flash via gateware-update on the running linux board.
The mechanics of building a PolarFire SoC bitstream and writing it through Linux’s gateware-update tool are covered in the gateware repo’s own README and in BeagleBoard.org’s BeagleV-Fire documentation — start there if you’ve never flashed gateware on this board. Reboot once it’s written. From that point on the cape headers carry the signals the ArduPilot Devicetree expects.
Step 2 — Toolchain and source
Install the Zephyr SDK and host dependencies by following the official Zephyr SDK installation guide, then clone the fork with submodules and point CROSS_COMPILE at the RISC-V toolchain:
Step 3 — Configure and build ArduCopter
git clone --recursive https://github.com/marcoantonio-ferrera/ardupilot.git

cd ardupilot

export CROSS_COMPILE=riscv-none-elf-

export PATH=/path/to/riscv-none-elf-gcc/bin:$PATH

./waf configure --board beaglev_fire

./waf build
The output you care about is:
build/beaglev_fire/zephyr_build/zephyr/zephyr.elf
build/beaglev_fire/zephyr_build/zephyr/zephyr.bin
Step 4 — Flash the firmware to the BeagleV-Fire
The flashing procedure is the standard Zephyr-on-BeagleV-Fire flow: wrap zephyr.elf with hss-payload-generator, interrupt HSS at boot, and write the image via the board’s USB mass-storage mode. It’s documented step-by-step in the upstream Zephyr BeagleV-Fire board guide — follow that page rather than reproducing it here.
One thing to update from the upstream YAML: the exec-addr shown in the board guide (0x1000000000) is the default Zephyr sample’s load address. The ArduPilot build relocates the entry point to (0x1004000000)— confirm yours with riscv-none-elf-readelf -h build/beaglev_fire/zephyr_build/zephyr/zephyr.elf and copy the Entry point address into exec-addr (and u54_1 under hart-entry-points) before running hss-payload-generator. If the addresses don’t match the ELF, HSS will hand control to garbage and the board appears dead.
After reboot, plug a USB-serial adapter into MMUART2 at 115200, point Mission Planner at it, and you should see ArduCopter come up.
What this means for other boards
The porting recipe in the HAL README on the fork walks through adding a BeagleBone AI-64 (Cortex-R5F on a TI J721E) as a worked example — exactly which four files you create and what goes in them.
That’s the long-term vision of the ArduPilot Zephyr HAL: one port, any Zephyr-supported board.
The point isn’t that BeagleBone AI-64 specifically is now an ArduPilot target. The point is that if your board has a Zephyr port and the sensors you need, adding it is an afternoon of writing board files, not a fork of the autopilot codebase.
If you have a board on the Zephyr board catalog — STM32 Nucleos, nRF kits, ESP32s, other BeagleBoard.org designs — the recipe should get you from hwdef.dat to first boot in an afternoon. After that it’s sensors and tuning.
The code is open, the RTOS is open, the hardware is open. Go build something.
⚠ Safety notice — please read before flying
This is a prototype, work-in-progress flight controller. The ArduPilot Zephyr HAL has not been through ArduPilot’s upstream review and is not yet on the list of officially supported boards. Several safety-critical features that ChibiOS-based boards take for granted are either missing, partially implemented, or untested on this port — including but not limited to: failsafe behaviour edge cases, watchdog coverage on all harts, deterministic boot timing, and long-soak reliability of the storage and EKF paths.
If you decide to fly this:
- Bench-test first, every time. Verify arming, mode changes, RC failsafe, telemetry, and battery failsafe with the props off before any flight.
- Fly in an open, unpopulated area. No people, animals, vehicles, or structures within the worst-case fly-away radius.
- Use a hardware kill-switch / arming switch on the transmitter, and a battery you’re prepared to lose.
- Start with hover-and-land tests on the smallest reasonable airframe before attempting anything aggressive or autonomous.
- Comply with local drone regulations (registration, line-of-sight, altitude limits, no-fly zones). Experimental firmware does not exempt you from any of them.
- Have an independent visual observer when testing, and a way to disarm immediately.
You are flying experimental software. The author and the ArduPilot, Zephyr, and BeagleBoard.org projects offer this work without warranty of any kind. You are solely responsible for any damage, injury, or loss that results from running it. If you are not comfortable accepting that responsibility, wait until this work has been upstreamed and validated before flying.
Fork (not yet upstream): github.com/marcoantonio-ferrera/ardupilot
HAL source: browse the source on the fork
ArduPilot · Zephyr Project · BeagleV-Fire
Comments are not currently available for this post.