Categories: Beginner, Education, Internet of Things (IoT), PocketBeagle
Motivations
Every morning starts off with checking your texts, weather, emails, and sometimes, when you’re feeling real good and on top of things, the news. But, to check these, you need to open up your phone texting app, the weather app, and a news app on your phone, or at least scroll through all your notifications on your phone.
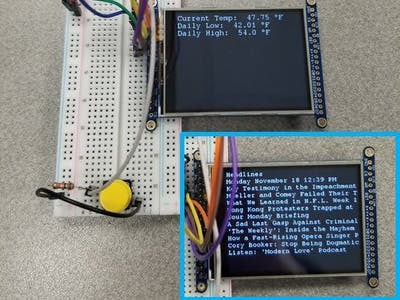
To help make my morning, and hopefully yours, a little easier, my goal is to create a screen for your bedside table that will show the daily forecast and the current temperature, as well as the news headlines of the day. With one glance, you can see all that you need to know to start off your morning: how to dress appropriately for the day and the current events that occurred overnight.
Overview: System and Power Block Diagram
Connecting to the Wifi Using a Wifi Dongle
To connect to the wifi, I needed a microUSB breakout, USB to microUSB adapter, and a wifi dongle. On the PocketBeagle, I first soldered the pins VBUS (P1_5) and VIN (P1_7) together and the pins ID (P1_13) and GND (P1_15) together to prepare them for use. Then, I connected the microUSB breakout board to the USB1 bus on the PocketBeagle (pins 7-15). Finally, I inserted the wifi dongle into the USB to microUSB adapter. With the hardware for the wifi dongle, I proceeded onto the software aspect of connecting to the wifi.
In the Linux Cloud9 terminal, I run the following the code to connect to the wifi:
debian@beaglebone:/var/lib/cloud9/ENGI301/Project_01$ connmanctl

connmanctl> enable wifi

Error wifi: Already enabled

connmanctl> scan wifi

Scan completed for wifi

connmanctl> services

*AR Rice IoT             wifi_74da38de508b_5269636520496f54_managed_none

*A  Rice Visitor         wifi_74da38de508b_526963652056697369746f72_managed_none

Rice Owls            wifi_74da38de508b_52696365204f776c73_managed_ieee8021x

eduroam              wifi_74da38de508b_656475726f616d_managed_ieee8021x

DIRECT-f3-HP M15 LaserJet wifi_74da38de508b_4449524543542d66332d4850204d3135204c617365724a6574_managed_psk

connmanctl> agent on

Agent registered

connmanctl> connect wifi_74da38de508b_526963652056697369746f72_managed_none

Connected wifi_74da38de508b_526963652056697369746f72_managed_none
Retrieving the Weather Data
To retrieve the daily forecasts, I used PyOWM, a client Python wrapper library for OpenWeatherMap. OpenWeatherMap (
http://openweathermap.com/
) is an API that can be used to retrieve weather data with an API key.
from pyowm import OWM
I created a free account and received an API key (free subscription*).
API_key = 'ada0a3424a34c9445c81fba49df33410'

owm = OWM(API_key)
Next, for the location of which I would like to gather data, I found the Houston, Texas’ city ID which is 4699006.
#For Houston (city ID = 46990066)

obs = owm.weather_at_id(4699066)
After defining these variables, I gathered the the three temperature measurements using get_weather and get_temperature. Additional queries and calls can be found at the link below on PyOWM documentation:
https://buildmedia.readthedocs.org/media/pdf/pyowm/latest/pyowm.pdf
# Retrieve daily lows and highs as well as the current temperature

w = obs.get_weather()

temp = w.get_temperature('fahrenheit')
*The free subscription is restrictive in the data you can call and access. Fortunately, I have access to the current temperature as well as the high and low temperatures of the day. More information about subscription access can be found at
http://openweathermap.com/.
Retrieving News Headlines
To retrieve the daily news headlines, I imported numerous libraries:
- requests
- bs4 (BeautifulSoup)
- json
- datetime
"requests" is a library that helps us make HTTP requests when I scrape data (headlines) from the New York Times website.
import requests

url = "https://www.nytimes.com/"

r = requests.get(url)
"bs4" is a library that helps parse data out of HTML. More information about bs4 usage can be found at:
https://www.crummy.com/software/BeautifulSoup/bs4/doc/
.
from bs4 import BeautifulSoup

r_html = r.text

soup = BeautifulSoup(r_html, "html.parser")

scripts = soup.find_all('script')
"json" is a library that can encode and decode JSON, text written in JavaScript object notation. I used json to decode JSON from the web scraped data into Python.
import json


for script in scripts:

    if 'preloadedData' in script.text:

        jsonStr = script.text

        jsonStr = jsonStr.split('=', 1)[1].strip()

        jsonStr = jsonStr.rsplit(';', 1)[0]

        jsonObj = json.loads(jsonStr)
Using these libraries, I can find and scrape the news headlines to display on the LCD screen later.
Setting up the LCD Screen
Hardware:
To physically connect the LCD screen to the PocketBeagle, I used pins Vin, GND, CLK, MISO, MOSI, CS, D/C, and RST on the LCD screen. I connected these pins to their respective pins on the PocketBeagle (SPI0 and GPIO). The connections can be found on the fritzing diagram at the end of this document.
I followed the instructions given by the manufacturer of the LCD screen which can be found here:
https://learn.adafruit.com/adafruit-2-dot-8-color-tft-touchscreen-breakout-v2/overview.
*
*At first, my LCD screen was not interfacing with the PocketBeagle despite the proper connections. I later found that it was due to a crucial step that I missed; the IM1, IM2, and IM3 jumpers on the back face of the LCD screen have to be closed by soldering them:
Software:
To setup and use the LCD screen with the PocketBeagle, I imported several libraries. The step-by-step process I took to setup and use the LCD screen was based on a basic set of instructions the manufacturer provided found here:
http://learn.adafruit.com/adafruit-2-dot-8-color-tft-touchscreen-breakout-v2
.
- digitalio
- board
- PIL
- adafruit_rgb_display
- Adafruit_BBIO
- time
- textwrap
"digitalio" is a library that provides basic digital pin support.
"board" is a library used to describe and set up the pins used and the board. "digitalio" and "board" are used together:
import board

import digitalio


cs_pin    = digitalio.DigitalInOut(board.P2_2)

dc_pin    = digitalio.DigitalInOut(board.P2_4)

reset_pin = digitalio.DigitalInOut(board.P2_6)


spi       = board.SPI()
"PIL" is the Python imaging library. I particularly found this link useful to understand the modules and usage pertaining to the modules:
https://pillow.readthedocs.io/en/stable/
.This library is used to actually display the text (weather updates and news headlines) on the LCD screen.
from PIL import Image, ImageDraw, ImageFont
"adafruit_rgb_display" is a library used to interface the LCD screen (ILI9341). This library was recommended through the vendor of the LCD screen. I followed the instructions to this driver:
https://github.com/adafruit/Adafruit_CircuitPython_RGB_Display
.
import adafruit_rgb_display.ili9341 as ili9341

disp      = ili9341.ILI9341(spi, rotation=90, cs=cs_pin, dc=dc_pin, rst=reset_pin,

                            baudrate=BAUDRATE)
In order to follow this, I had to install dependencies of the driver prior to installing the driver as well. The instructions can be found here:
https://github.com/adafruit/CircuitPython_Community_Bundle
. To use this driver for ILI9341, other installations were made (described in the README file in the driver). In general, I followed these steps to install the necessary driver:
sudo pip3 install Adafruit_Blinka


# if the Adafruit_Blinka installation does not work:

# sudo apt-get install python-setuptools

# sudo apt-get install python-dev


pip3 install adafruit-circuitpython-lis3dh


# Download the bundle zip file from the (CircuitPython_Community_Bundle link)

git submodule init

git submodule update


sudo apt-get install python3-venv


python3 -m venv .env


source .env/bin/activate


pip install circuitpython-build-tools


source .env/bin/activate


circuitpython-build-bundles --filename_prefix adafruit-circuitpython-bundle --library_location libraries --library_depth 2


sudo pip3 install adafruit-circuitpython-rgb-display
Adafruit_Blinka mirrors CircuitPython so that I can use the other libraries, such as "board" and "digitalio". Digitalio and board are used to define and describe the pin outputs of the PocketBeagle so that we can set up the display.
"Adafruit_BBIO" is used so that I can use the GPIO pins, specifically for the button. Using this library, the user can control the display at the press of a button.
import Adafruit_BBIO.GPIO as GPIO
"time" is a library, which I specifically use to record the time passed while the button is pressed. Recording the time is essential because the device stops running the script when the button is pressed for longer than 2 seconds. When the button is pressed for less than 2 seconds, the user can switch between viewing the weather forecast of the day and the news headlines.
Displaying on the LCD Screen
To display the contents on the LCD screen, we use the PIL library as seen below. In addition, I downloaded a zip file of different fonts to help define "fnt".
def createRGB(disp):

    if disp.rotation % 180 == 90:

        height = disp.width   # we swap height/width to rotate it to landscape!

        width  = disp.height

    else:

    width  = disp.width   # we swap height/width to rotate it to landscape!

    height = disp.height

    image = Image.new('RGB', (width, height))


    # Reset the display

    draw = ImageDraw.Draw(image)

    draw.rectangle((0, 0, width, height), outline=0, fill=(0, 0, 0))

    disp.image(image)


    # Display the desired output

    fnt = ImageFont.truetype('Pillow-master/Tests/fonts/FreeMono.ttf', 16)

    draw.text((0,0), text=cleand, fill = (255,255,255), font=fnt)

    disp.image(image)

return createRGB(disp)
Controlling the Display with a Button
My device allows the user to control which information they would like to see (either the weather forecast or the news headlines) by pressing a button.
I added the button using a 1k ohm resistor to 3.3V input from one input to the button and connecting the diagonal pin from that of the 3.3 V input to the GPIO on the PocketBeagle (white wire).
Specifically, if the number of times the button is pressed is odd, then the weather forecast is displayed. If the number of times the button is pressed is even, then the news headlines are displayed. In addition, I added a feature so that if the button is pressed for longer than 2 seconds, then the script exits and stops running.
def task():

    button_press      = 0

    button_press_time = 0.0

    while(1):

        # Wait for button press

        while(GPIO.input(BUTTON0) == 1):

            pass # don't do anything if 1, just keep coming back to check condition

        # Record time

        button_press_time = time.time()

        # Wait for button release

        while(GPIO.input(BUTTON0) == 0):

            pass

        # If instantaneously pressed (ie less than 2)

        if ((time.time() - button_press_time) > 2.0): #if beyond 2 seconds

            exit() #exits out of script

        else:

            button_press += 1

            #Times the button is pressed: display news (even) or weather (odd)

            if (button_press % 2) == 1:

                WeatherUpdate(DL_raw, DH_raw, DC_raw)

            else:

                NewsUpdate(News_Info, Article)

# End def
The complete code as well as the circuit diagram can be found at the end of this document.
Future Plans and Work
There are some components that I would like to add this project such as:
- a calendar display (showing the daily events, schedules, etc.)
- SMS texts
In addition, I would like to create a better user interface for the device (no exposed wires, etc.). Ideally, the LCD screen would have a frame or box around it that encloses all the wires and the PocketBeagle. In addition, I would like to make it easier to read the news headlines on the screen (so they don’t get cut off but also all fit on the screen). Also, the LCD screen has a touchscreen function that would be useful when switching between the news headlines display and weather display. I found a github repository that might be useful through the LCD screen manufacturer’s website. However, it is written for Arduino. (
https://github.com/adafruit/Adafruit_TouchScreen
)
Furthermore, I would like to have the device completely independent from the computer. To accomplish this, I need a USB port, as I already have a power bank, to connect the wifi dongle and the power bank.
*A quick note: I attempted to have the device run an autoboot. However, there is an issue with the wifi dongle and connection. I would recommend using a different wifi dongle or connection to have the device autoboot. The shell script I have uploaded should work however with the correct wifi device!
Final Video:
To summarize, one only needs to connect the PocketBeagle with a power source. Once connected, the device will start to run. If the user presses the button once, the weather forecast of the day will be displayed. If the button is pressed one more time, the news headlines are displayed on the LCD screen. Continuously pressing the button will result in alternating displays on the LCD screen of the news headlines and the weather forecast.
Comments are not currently available for this post.