Categories: Beginner, Internet of Things (IoT), Robotics, SeeedStudio BeagleBone Green Wireless
Hello,
This is a Mask of components and software that I put together w/ a couple amounts of time. I hope you enjoy it.
…
First, I purchased a BBB and then a BBGW (BeagleBone Green Wireless). I ended up developing machines and ideas from those two purchases. Good luck to me, right? Anyway…the trials and learning persisted and I am here now to introduce something I have put together for enjoyment purposes that can be used to dictate location of specific machinery, e.g. machinery that moves.
Second, I put a mini bot together to learn and failed miserably many times over and over again. Finally, some years later, I learned things and found out that portions of ideas are just that…they are just portions of ideas. Sometimes it takes pursuit and knowledge.
Starting from scratch in this field is not easy, i.e. even w/ Open Source software and ideas circulating around the Internet.
Anyway, time to get to it.
…
- Get all your components!
- Research the books and ideas.
- A couple good starter books are "Getting Started with BeagleBone (Richardson 2013)" and "BeagleBone by Example (Prabakar 2016)."
- Get a fresh image from
bbb.io/latest-images
(
Debian
9.5
2018-10-07
4GB SD
IoT
). Getting your board up to date is important and makes things go smoothly compared to trying to take a "crash course" in what is wrong. - Use this guide,
https://beagleboard.org/getting-started,
to set up the chosen image w/ balenaEtcher. You will have to download Etcher from
https://www.balena.io/etcher/
if you are on a Windows Host Computer. If you are using a Linux Distro for your development, say Ubuntu, plug your SD Card in the host computer and use the Disks utility on Ubuntu to note the name of the directory of your SD Card and to unmount w/ Disks the SD Card. - Next…we need to decompress the image file if you are on Ubuntu w/
unxz <your.img file>
from above. - Next…use
dd if=<your.img file>
\
of=/dev/sdb
bs=8M
and that will write the Debian image to your SD Card. Please remember to note down your location/name of the directory for the SD Card b/c the
of=/dev/sdb
section of that above command is the location of the SD Card on your host computer. - Make sure you use apt update on your BBGW and apt upgrade to update and upgrade your board.
- If you are using an SD Card instead of your eMMC on the BBGW, which I hope you do, you will need to erase the eMMC or you will have to hold down your S2 button the board each time you boot or reboot the BBGW.
- To erase the eMMC on your board, use this command:
sudo dd if=/dev/zero of=/dev/mmcblk1.
The reasoning on holding the S2 button on the BBGW is to preserve the bootloader that is new on the SD Card instead of an older bootloader on the eMMC. If you have an updated eMMC w/ a fresh image, go to /opt/scripts/tools/, and try
git pull.
Next, use this command,
sudo./version.sh | grep bootloader
to check which bootloader is on your eMMC. Remember if you are still on an SD Card for your board, this will be impossible unless you make your SD Card a "flasher" image. - To make your "standalone" image a "flasher" image, simply go to the /boot directory and change your
uEnv.txt
file w/ your favorite editor in the terminal. - Once in the your favorite editor, say nano b/c it is easy to learn, go to the end of that
uEnv.txt
file and find the "#" mark in front of this line:
#cmdline=init=/opt/scripts/tools/eMMC/init-eMMC-flasher-v3.sh
. It is called removing a comment. The hash mark or "#" is the commented section. - When you power off and then boot w/out the SD Card inserted, you can find out exactly what is on your eMMC and which bootloader you have installed. Once you are at this point, check the bootloader version like typed above. To update your bootloader, try
sudo./update_bootloader.sh
in the /opt/scripts/tools/developers/ directory. - Now…REBOOT!
- Okay…that ends set up for now.
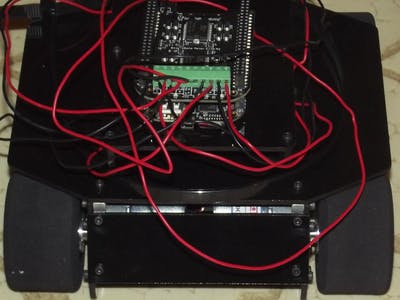
- Next, we need to set up our software on the BBGW and attach the hardware. Luckily, for our sake and for convenience, the MotorCape and Grove GPS will fit in nicely w/ little effort.
- Attach your MotorCape to your BBGW and the Grove GPS to the Grove UART connection on the back of the BBGW.
- Oh! Make sure you do not "hot plug" items in your BBB family boards or any piece of hardware for that fact. "Hot plugging" is just attaching peripherals to your board when the board is powered.
- Software: Go to
https://github.com/silver2row/motocape
to get some easy software to comprehend and make things work. Do not be afraid to try out new methods and applications w/ your set up. This is my
GitHub.com
page online and I used this bit of software at a local Maker Faire in March. You can see in the main Python software,
https://github.com/silver2row/motocape/blob/master/MotoCapeIII.py,
we are using Adafruit_BBIO and Flask alongside Python. Adafruit_BBIO will allow us to manage our pins and connections while Flask will be a specific type of server for reaching online connections at a specific address on the 5000 port. - Also, you will need to create a, if you are not using the
silver2row/motocape/
software directly, a
templates
directory in your current directory. - Once in your templates directory, make a HTML file called whatever you want as long as you point to it w/ your Python-Flask application. You can see the
MotoCapeIII.py
software on the end of the source code where we are stating return render_template("boboIV.html", **template_data) where
boboIV.html
is our HTML page in the templates directory. - Now…we need to create a simple bootable piece of software w/ a.service file.
[Unit]

Description=Whatever You Would Like to Describe about Your File


[Service]

ExecStart=/The/Path/To/Your/File.py


[Install]

WantedBy=multi-user.target
- So, again w/ your favorite text editor, type the above info. into your.service file at this directory:
/etc/systemd/system/yourFile.service
and call your.service file something you can remember. - Next, enable and start the.service file in the terminal w/ these commands: sudo systemctl enable
yourFile.service
. Then, the start of the.service file w/ this command, sudo systemctl start yourFile.service, to make sure we can see its status on the terminal w/ this command: sudo systemctl status yourFile.service. - Now, reboot! This, when ran, should show our.service file working: sudo systemctl status yourFile.service.
- Next, we need to get the program Google Earth Pro at
https://www.google.com/earth/versions/
to be able to make our routes from our RoverBot able to be seen in Google Earth Pro. If you are using a cell phone w/ cell service, either 3G or 4G, to look at your mappings w/ Google Earth Pro, please make sure you pick the Google Earth on Mobile or if you have a plan w/ your Laptop Computer and an inverter for use, you need to pick the desktop version. Oh and you can always view the Earth w/ Google Earth Pro in a Browser. - Now, we are going to make some more software, thus of which I found online at toptechboy.com, to manage our Grove GPS module via a UART connection on the BBGW.
- So, w/out further waiting, I am sad to announce that Python 2.x.x has been deprecated. There is not a way, from
python.org
, to get it on a computer. - This means, we must be a savvy user and find new paths, i.e. a "hack" if you will.
- But, since we are here, the software is found here:
https://github.com/silver2row/bbgwGPS/blob/master/GPS.py.
You can see we are importing Adafruit_BBIO.UART as UART and serial. I have come across many errors recently b/c this software was intended for Python2 only. Since the Python2 deprecation, this software is iffy. You may still be able to get Python2 on the Debian repos but I am not sure as of right now. - Okay…since we have a Grove GPS and a Grove UART connection on the back of the BBGW, we can use this client for GPS discovery:
https://pypi.org/project/gps3/. - pip3 install gps3
- That above command will get you the desired pip set up on your board for gps3, i.e. the BBGW.
- W/ your Grove GPS attached to your Grove UART connection on the BBGW, try this bunch of software to see different mechanisms that gps3 can do.
#!/usr/bin/python3


from gps3 import gps3

import time


gps_socket = gps3.GPSDSocket()

data_stream = gps3.DataStream()

gps_socket.connect()

gps_socket.watch()


for new_data in gps_socket:

   if new_data:

       data_stream.unpack(new_data)

       print("__________")

       for key, value in data_stream.TPV.items():

           print("%s: %s" % (key, value))


           time.sleep(3)


           #To make the above software load in a file called MoreData.txt


           c = new_data

           d = open('MoreData.txt', 'w')

           d.write('# MoreData.txt \n \nc = %s' %c)

           d.close


#for testing purposes, this bunch of software will do just fine.


#for now, the software here only shows you your .txt files when you look them up.


#for additional 'a' (append) and file orientation, please see python.org.


#for allocating data to new sections for review, check the .csv file sections

#in python.org for Python3.
- I received some help from #beagle on Freenode w/ a chatting application. I am pretty sure that you can sign in on Freenode on
bbb.io
under /chat. - If you ask difficult questions on your end, people may reply one day. Keep watching for answers. Their help and the community all pitch in at times.
- Now…we can start this script at boot just like we did before so we do not have to sign in and we can see our data from
MoreData.txt
once we sign in again. - If you are a file person that knows how to manage files well, have at this software and change it to suit your needs. No warranty and not one single license!
- Enjoy!
So now, we should have control of our bot w/ software and a website.
We should also have control of a bootable config. file called a.service file for this software and for the gps3 software.
…
So, we can track our "Monster" of a bot down slopes, up banks, and through the river beds. If you are having an issue controlling your bot or having an issue w/ your GPS working, do not hesitate to contact me. Oh! You must append new data to the
MoreData.txt
file or another file of your choosing. Enjoy!
Seth
P.S. If you want to set up a server w/
linode.com
and use apache2, use /etc/apache2/sites-available, and set up your own.conf file and then go w/ this command: sudo a2dissite *default.
Next…then, say your new.conf file was the name of your website w/ a.conf ending to the file name, use this command: sudo a2ensite blah-blah.com.conf.
Next…adding info. to your site: You can look online a
w3schools.com
and find some non-licensed software from them w/ a bunch of additional info. on front-end programming.
Next…go to /var/www/html/.
Use this command: sudo <your favorite text editor> index.html. This will help you alter your
index.html
file to suit your needs. If you plan on hosting the site w/ linode.com, you can find plenty of their housed tutorials on ideas plus you can always go to the source, e.g.
ubuntu.com
or Debian.org.
Next…See here if you need host the site on a home server:
https://help.ubuntu.com/lts/serverguide/index.html.en.
This is a very nice tutorial.
…
Both wikis on both sites are good, i.e. community and professional.
…
I think this may be beyond the scope of this small presentation but you can look to adding your
blah-blah.com
site, where blah-blah is the name of your chosen site, to
linode.com
for hosting w/ a www record w/ your listed, public IP Address.
Next…use the cname record to add your host name (IP Address) to your aliases (website address)/blah-blah.com or whatever it may be at the time.
Aw!
Comments are not currently available for this post.