Categories: Complete, Intermediate, Internet of Things (IoT), SeeedStudio BeagleBone Green
Introduction
BeagleAlexa was created to fill a big gap I saw in hobbyist home IoT automation projects. Until recently, voice recognition was limited to desktops or smartphones. The amazing Amazon Echo made voice recognition and computer based personal assistant alot more accessible to everyone. But as a hobbyist and developer there were still some things that I wanted beyond the Echo’s capability.
The biggest shortfall I’ve seen in similar hobbyist projects is that they never combine several technologies to create a true voice interactive platform. Some projects have Alexa style intelligence but requires physical contact to activate it. Other IoT projects only run code in the cloud which makes interacting with physical hardware almost impossible. Finally, rarely does a project actually speak to you. Typically, you have to read a LCD screen or look at leds to understand what is going on.
BeagleAlexa overcomes all these limitations to create a single simple but powerful IoT platform.
Video Demos
Quick Demo
Grove Temperature Sensor reading demo
Hardware
Hardware Goals
- System should be easy to build
- System should be cheap (
- Parts used should easy to get
- Learn more about SeedStudio, SeeedStudio’s Beaglebone Green and their Grove sensors ecosystem.
Overview
At a high level what you will need is the awesome Beaglebone Green created by SeeedStudio. Beaglebone Green takes a power TI Cortex A8 ARM SOC and uses the familiar Beaglebone accessible headers which aids in hardware extensibility.
You will also need 5V DC power supply, speakers, microphones and USB audio dongle and a way to connect the Beaglebone Green to the internet. To avoid needing a USB hub I went with Ethernet.
Important
If your Beaglebone Green board will be powering other components beyond a few mA you should use a 5V DC power supply. Depending on a USB power can lead to software instability or frying your USB port.
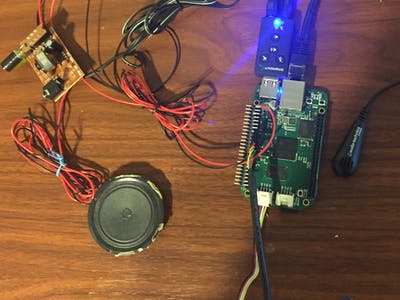
Below is pretty picture of all the individual major components I used.
To save money I went to the local electronics store and found speakers that were only $3 and most importantly powered via USB (5V). This allowed me to use the same power supply used for the Beaglebone Green to also power the speakers. You will need a speaker that includes an audio amplifier since the audio won’t be loud if its just powered by the USB Audio Adapter.
To be able to power the Beaglebone Green and speakers I wired the DC jack so it can individually power both components.
Here is a close up picture of the Beaglebone Green powered on with a header that is connected to the 5V DC power supply.
Here is a picture of all the various components wired together. It looks a bit messy because i used super long wires for some reason but I did my best with cable management.
Software
Software Overview
So the goal of this project is simple. I wanted to create an Alexa like system but also make it easier for me to manipulate hardware using voice recognition.
High Level Flow Chart of Algorithm
Software Goals
- System can use a keyword to understand when it should start listening to a request.
- System should be able to have similar intelligence vs other well known digital personal assistants such as Siri, Ok Google, Alexa and Cortona.
- System should be able to execute custom code locally based on spoken request.
- Project should be interesting enough for me and others to use and continue to expand upon.
Major Software Components Overview
Below I give a brief description of the major libraries or services I use and why.
Alexa
Amazon’s amazing Amazon Echo for $179 or Echo Dot for $90 provides an awesome personal assistant that keeps on getting smarter and smarter. Amazon has an
Alexa Voice Service
that allows a user to mimic a lot of functionality of the Amazon Echo.
The recently released
alexa-avs-raspberry-pi
code actually inspired me to do this project. However, the code is dependent on using Java which on an embedded platform is a hassle. You also needed VNC and the actual application is a gui which doesn’t fit my hands free goal.
I ended up using
AlexaP
i which provides almost as much functionality as alexa-avs-raspberry-pi but only requires Python. Best of all it was pretty simple. Activating the Alexa service via a button click or pushing of a button is a shortcoming of all Alexa clones I’ve seen including AlexaPi. But there is another library that helps solve this problem!
CMU Sphinx
Sphinx is an awesome library that provides offline (no internet required) speech recognition capability. Its pretty complex and pretty flexible. However, it seems that you should know a lot of speech recognition to do anything advanced with it.
Good thing I just needed something simple. I only need to detect a single word that will trigger Alexa and other services. Luckily this is pretty simple.
Wit.ai
Wit.ai is a pretty sweet speech recognition / machine learning service. You can simply send audio or text to Wit.ai. On their site you create "intents" which are commands you want your application to recognize.
The cool thing is it has a machine learning component that allows it to detect if a request is the same even though the wording may be different. For example, I can teach it that saying "Wake me up at 10 AM" means the same as "Set my alarm to 10 AM". Initially the system may not know that those two phrases mean the same thing but through a validation process you can train the system to understand the relationship. Its a bit manually process but its cool since it allows you to write less code while also having your software become smarter.
The biggest reason why I included this library is that it simply returns the various "intent" that I created based on the user’s audio request I can then run custom code that can act on these custom "intents". For example, Wit.ai can tell me that a voice command was a "turn lights off intent". On the Beaglebone Green I can handle this in a variety of ways depending on my setup. So turning off a light could mean toggling a pin for a relay, send an HTTP request to a local web controlled power strip, send an IFFIT request etc.. The most important thing is that this logic can be kept on the Beaglebone Green as much as possible. For demonstration purposes, the way I show case this is via reading the temperature from a Grove temperature and humidity sensor.
Getting Started
This project assumes you know the very basics about the Beaglebone Green or its variants. If you haven’t used a Beaglebone please check out one of the many tutorials that can be found on the internet.
Baseline
To insure that these instructions are full proof and problem free I recommend flashing the
eMMC
with the
Debian 7.9 distribution image
hosted on the
Beagleboard
main website.
Once you have everything flashed, connect the Beaglebone Green to your PC so that you have a serial terminal and can login into the Debian prompt using the username "root". Also make sure your Beaglebone has a way to connect to the internet. Example
USB tethering
, Ethernet or
Wifi
based.
Getting Internet Working
For our project we will need a connection to the internet to install software and also to access Facebook’s and Amazon’s servers. So run the below command for a quick ping test.
ping seeedstudio.com
Hopefully you will see something similar to below.
If you see something similar to the below then you have an internet problem.
If pinging fails then the issue can be due to a variety of reasons depending on your setup. If your connecting your Beaglebone Green to your PC for internet via USB then take a look
here
. If your using a wifi dongle (you will need a USB hub for this project then) then look at the guide
here
from Adafruit. If your like me and connecting your Beaglebone Green via Ethernet then you may need to run the below commands
sudo /sbin/route adddefault gw
The above command needs to ran every time at boot. I’m sure there is a better solution but the above worked for me.
Installing a bunch of Linux packages.
Now that you got the internet working on your Beaglebone Green its time to install software via apt-get. These are all the packages you need for the code you will be running.
sudo apt-get update

sudo apt-get install swig python-alsaaudio sox espeak libcurl4-openssl-dev libsox-fmt-mp3
Installing a bunch of Python packages
Once this finishes you will also need to install a couple of Python libraries that aren’t included by default.
pip install pycurl cherrypy
Edit configuration files
Before we go any further we need to modify some system config options.
First append the following lines to /root/.bashrc
export LD_LIBRARY_PATH=/usr/local/lib

export PKG_CONFIG_PATH=/usr/local/lib/pkgconfig

export PYTHONPATH=/usr/local/lib/python2.7/site-packages/
This will allow Python and Sphinx to find the various libraries we will be manually compiling soon.
Set proper audio default
Now we need alsa to properly use our USB Audio dongle by default.
Edit /etc/modprobe.d/alsa-base.conf and change the line "options snd-usb-audio index=" from -2 to 0
Download and Building Software
We need a library called PocketSphinx that provides offline speech recognition and the critical BeagleAlexa program.
Clone repositories
First we will use git to clone the various repositories we need.
Run the below command:
cd /root/

git clone https://github.com/cmusphinx/sphinxbase.git

git clone https://github.com/cmusphinx/pocketsphinx.git

git clone https://github.com/fcooper/beagleman.git
Cloning error message
I did get the below error when I tried to clone the above repositories the first time although I don’t know why.
However, I simply ran the below command and reran the clone commands and the problem went away.
git config --globalhttp.sslVerify false
Building PocketSphinx
Now lets build these two libraries.
First we will build Sphinxbase.
cd /root/sphinxbase

./autogen.sh

make

make install
Now lets build PocketSphinx
cd /root/pocketsphinx

./autogen.sh

make

make install
You shouldn’t run into any issues or dependencies problems.
Account Creation
Create Amazon Account
Now its time to create an Amazon Developer account that you will use for Alexa. This have been covered a lot so I don’t want to repeat the instructions here.
Here is a great
Youtube video
that talks about setting it up. Or you can follow the guide
here
from the folks from Amazon that talked about getting the Alexa Java client working on Raspberry Pi. If you used the last guide, start at section 3 "Getting started with Alexa Voice Service".
Only follow the steps to signup and register for the Alexa Voice service which is on the Amazon Developers site. Ignore everything that is related to the Raspberry Pi. But do keep track of the below values while going through this process.
- Product ID
- Security Profile Description
- Security Profile ID
- Client ID
- Client Secret
Also for both guides make sure for the Allowed Origins and Allowed Return URLs entries to use "http" instead of "https". Also do not use port "3000" instead use 5000. Finally, since we aren’t going to bother with using VNC instead of using localhost replace it with the actually Beaglebone Green ip. This will allow you to perform the authorization step on any computer or smartphone on the same local network as the Beaglebone Green.
Get Amazon Token
Now Its time to create the creds.py which includes all the important credentials I mentioned earlier.
cd /root/beagleman

cp example_creds.py creds.py
Within creds.py update the various python variables with the values you got while signing up for the Amazon Alexa services.
Now execute the below command:
python auth_web.py &
If your connected via VNC go to http://localhost:5000. Otherwise on any computer that is on the same network as the Beaglebone Green go to
http://:5000
If successful, you should see a login to Amazon’s Voice Service system.
You should see the following success screen after your login
If you run into an error with the above, make sure your using the exact values that you entered while signing up for the Amazon Alexa service.
Create Wit.Ai account
Signing up is pretty self explanatory. Go to the Wit.ai
homepage
and signup!
Once signed in go to Settings and write down the "Server Access Token"
Now within the beagleman directory edit beagleman.py and find the variable "wit_token" and substitute its placeholder with the server access token seen in the previous step.
Since your starting this from scratch unfortunately you won’t get much from Wit.ai since you will need to create or import your own custom intent. It is simple to do and should only take you an hour to program some really cool things. I need to check to see if I am able to share my own custom intents so people can just import it and see the power with zero effort on their side.
Supported Phrases:
The system is able to respond to significant amount of request due to the power of Alexa. The only feature missing from Alexa seems to be the ability to play music from services like Pandora.
Feel free to ask it random things like:
- "Who is the 32th President of the United States?"
- "How far is the sun from the moon?"
- "Where is the closest highschool?"
The system via Wit.ai has been programmed to respond to the below custom phrases along with minor variants:
- "Set my alarm for ", "Wake me up at "
- "Where is SeeedStudio located?", "Where is the headquarters of SeeedStudio?"
- "What is the current temperature?" "Tell me the temperature in the room". This request responds using data from the physically connected temperature sensor.
More phrases can easily be added depending on the end product. I plan on supporting things like "Turn off my TV in 20 minutes." and "Turn off my lights in an hours". Turning things of before I go to sleep is a big annoyance for me :).
Mission Accomplished?
So I listed all my goals for this project previously and I’m happy to say I created a really amazing IoT product that accomplished all my goals!
1. System should be easy to build.
- Project is based on mostly off the shelf PC components. Very minor soldering required,
2. System should be cheap even if your only buying enough parts to make 1.
- I spent about $20-30 in parts beyond buying the Beaglebone Green. Cost will be higher or lower based on what features you want to add or remove.
3. Parts used should easy to get.
- All the parts I was able to get at a local electronics store.
4. Learn more about SeedStudio, SeeedStudio’s Beaglebone Green and their Grove sensors ecosystem.
- Yup
5.System can use a keyword to understand when it should start listening.
- Using Sphinx library to handle offline recognition.
6. System should be able to have intelligent like a personal assistant. Example Siri, Ok Google, Alexa and Cortona.
- Thanks to Amazon I was able to use the Alexa Voice Service.
7. System should be able to execute custom code locally based on spoken request.
- Thanks to Facebook’s Wit.ai service to provide this functionality.
8. System should be interesting enough for me to use and continue to expand upon. I will definitely use this in future projects.
- Can’t wait to simply say turn off lights instead of pulling the stupid ceiling fan chain.
Future Enhancements
Here are things on the short term I plan on enhancing in this project.
Offload Recording of Audio
Due to the AM335x (SOC on the BBG) being a single core ARM it is hard to do anything while having to read audio from the microphone. If you don’t read it fast enough you will get overflow errors and these overflows will cause the saved audio to be distorted which makes speech recognition almost impossible. If I can avoid this issue, then this system can be a lot more powerful since I do a lot more offline speech recognition. One potentially solution is to use the PRU to record the microphone audio data. However, a non USB microphone input will probably need to be used instead.
Higher Quality Components
To save money and make the system easier to build I ended up buying cheap speakers and microphones. However, this ends up impacting the user a bit. Audio doesn’t sound as crisp. Keyword/phrase isn’t always detected 100%. So the better the equipment the better my system will be. Thatis what I get for spending only $8 on speakers and microphone.
Learn more about Sphinx
I barely scratched the surface of what Sphinx can do. There are probably many things I can do to improve the recognition. Also the system isn’t that great in detecting voices in a very noisy room. More time in learning Sphinx or switching to another library may make this system a lot more robust.
Create an integrated cape
Although it may cost more and be harder for people to put together, ultimately this project should have its own dedicated cape. It would make things A LOT smaller and compact. Also it my take a lot of work and trial and error but performance will be a lot better. Also using a non USB audio solution may allow for me to use a much lower sample recording rate since the 44100 Hz (CD quality) is overkill for simply detecting a word being said since I only need about 16000 Hz. This may be the easiest way to avoid dealing with overflows.
Become more portable
Luckily I have a bunch of wireless bridges that I can connect this board to Ethernet anywhere in my house. However, for the typical user going with Wifi would be the better route. If a non USB Audio Jack is available, then using a Wifi dongle would be easy. Also being able to run off of DC or battery will make this system be alot more portable.
Conclusion
This was a really fun (although took alot of effort) IoT embedded project that I’m really happy that I did. I was able to learn and use libraries to handle speech recognition offline and online. I was also able to work on my first real audio project. Finally, I created something that I always wanted to create. I’m a huge fan of home automation and I believe that it is indeed the future but will only take off when voice recognition and machine learning plays a more important role.
Comments are not currently available for this post.