Categories: Intermediate
A classic toaster reflow oven built around the BeagleBone green. This oven uses MAX31855 to close the temperature sensing loop. 3 heating elements are controlled by SSR’s and provide even heat distribution and reduce over use of a particular element. Option for improved heat distribution using a fan is included as well as a web gui and a local display of current state at the oven using a Grove OLED.
Choosing an Oven
Choose an oven with a suitably small volume. This makes it have low thermal mass and easier to heat up and cool down to achieve proper reflow profile. One with a fan is good, but not necessary due to use of booster heating element providing extra heating. The great general oven build guide from Peter Easton can be found at
whizoo
. I used the
Controleo2
as my oven controller before transferring to beaglebone green for web access to oven.
Previous Experiments
My first version of the reflow oven involved a Digital Multimeter (
Digitek 4000-ZC
) with USB interface as the temperature sensor. The Multimeter is plugged into an EEE PC (via
FS9721 library
) which then sends
GPIO commands
out over another USB port to an Arduino to control the SSR’s. The chain of components in the control loop looks something like this:
Oven -> Thermocouple -> Digitek 4000ZC -> EeePC -> Arduino -> ULN2003 -> Fotek Relays -> Oven
This combination was pretty clunky and took up a lot of space. So when the controleo2 arrived I switched to it as the better option, until I needed a wireless link to the oven controller so that I could pop the boards in and run it unattended. It often happens that I have just put down solder paste and components and I am called off to dinner. So I would like to pop the boards in the oven quickly and control the reflow remotely.
Building it on a Breadboard
The first step is to prototype the build on breadboard and ensure all components can talk to each other and python code runs properly. I had
previously built
a beaglebone black reflow controller using a multimeter as temperature sensor. This time I chose to use the
MAX31855 breakout board
for access to temperature over Hardware SPI (SPI1,CS0) and control the heating elements using the same algorithm as controleo2 reflow wizard uses. The relays are driven by the
ULN2003 Darlington pair
based relay driver to reduce the load on the GPIO pins. The oled is just plugged into the BeagleBone Green i2c slot.
The Code
The code is adapted from Alexander Hiams’ toasterReflow project and in true maker tradition avoids re-inventing the wheel and instead improves on it by adding treads and brake pads. The Beaglebone Green’s GPIO’s are driven by a mixture of
PyBBIO
and
Adafruit GPIO
. This is because I could not get the PyBBIO dts based overlay loading mechanism to work in all cases. This is because the supported boards does on include BeagleBone Green in them. I decompiled the .dtbo files with dtc and recompiled them with BBG support.
dtc -I dts -O dtb PyBBIO-gpio0_10-00A0.dts > /root/PyBBIO-gpio0_10-00A0.dtb
with the following change:
compatible = "ti,beaglebone", "ti,beaglebone-black", "ti,beaglebone-green";
The oven has 3 controllable relays/heating elements so 3 heater pins are used instead of the original 1. Also there is a
servo mechanism
to open the door for cooling once reflow is done, and a
buzzer
which I salvaged from an old motherboard to wake you up in case you dozed off during the 4-5 minutes it takes to reflow. I have added a couple of buttons to start and abort reflow.
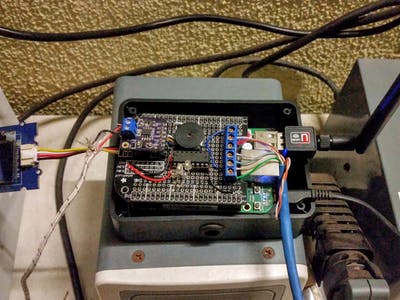
The Final Version
For the final version I took all the bells and buzzers and transferred them to a
BeagleBone proto cape
(an Adafruit design I got manufactured independently in black). There are screw terminals at the end to handle SSR’s , a plug to connect the servo as well as the buzzer on board. The code works identically on this much neater version and after a few calibration runs duty cycles on various phases are estimated and reflow curve is replicated (within tolerance). The oven functions better with proper insulation and on hotter days with less loss to the environment.
This project is really easy to build due to the ease of programming on board the BeagleBone in python and the huge number of available GPIO’s. Compared to this the Arduino Leonardo based version seems really resource constrained. You also have the option to use it without the web interface with local buttons and OLED or control it from the luxury of the couch with a tablet, after doing all the hard work of putting solder paste and placing components on the board.
Comments are not currently available for this post.