Categories: Beginner
Introduction
The goal of this project is to provide a step-by-step guide to use the
MikroElectronika OLED-C click board™
to add a 96×96 high-color OLED display to your
BeagleBoard.org® PocketBeagle®
. The PocketBeagle® is an ultra-tiny-yet-complete open-source USB-key-fob computer developed by
BeagleBoard.org®
and features the
OSD3358-SM System-in-Package (SiP) from Octavo Systems
.
Although this project describes the procedure to interface the OLED-C click board™, similar procedures can be followed to interface other click boards™.
Get the story behind the story on the
Octavo Systems blog site
.
BeagleBoard.org®
PocketBeagle® Headers
The following figure shows the pin-out of the 2 headers of PocketBeagle®.
The default function of each pin is highlighted in dashed line. Click boards™ have a standardized
MikroBUS
™ pin-out (shown below).
BeagleBoard.org®
PocketBeagle® (pictured below) headers conform to the MikroBUS™ standard and allow for two click boards™ to be interfaced with PocketBeagle® at a time (shown in the following figure). Although no guarantees are made with respect to compatibility, most click boards™ work with PocketBeagle® with a little bit of effort.
Follow the below steps to display a picture on the OLED C click. This procedure assumes that an SD card with a Linux image from Beagleboard.org:
https://beagleboard.org/latest-images
is installed on PocketBeagle®. Please see the
PocketBeagle System Reference Manual
for additional information on bringing up and connecting PocketBeagle®.
Step 1: Install Click board on
BeagleBoard.org®
PocketBeagle®
The OLED-C click board™ uses the SSD1351 OLED display driver IC to drive the
PSP27801
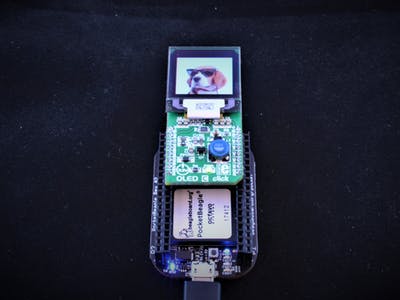
display. The board exposes SPI interface of SSD1351. We will use the SPI1 interface on PocketBeagle® to control the display driver IC. This is the "Click Board 2 Position" in the above pin out diagram. The following picture shows the board attached to PocketBeagle®.
Step 2: Connect PocketBeagle® via Cloud9 IDE
Use a Micro-USB to USB cable to connect PocketBeagle® to a computer/laptop. You should be able to bring up the Cloud9 IDE by entering the URL:
http://192.168.7.2:3000/ide.html
into the web browser. (use
http://192.168.6.2:3000/ide.html
for MAC o/s) Make sure you are using Chrome or Firefox. The IDE should look like the following figure:
Step 3: Device Tree Overlay
– Download into your PC then drag and drop the "PocketBeagle® OLED-C Click Device Tree Overlay Binary" file PB_SPI1_OLEDC_click.dtbo(Attached to this project) into the Cloud9 folder. This Device Tree Overlay will invoke the device drivers for the
MikroElectronika OLED-C click board™
.
– Next copy this same device tree overlay binary file (.dtbo) into /lib/firmware directory
sudo cp PB-SPI1-OLEDC-CLICK.dtbo /lib/firmware/
– Don’t forget to enter the password for debian (temppwd) when you execute a command as root
– Edit /boot/uEnv.txt to invoke overlay on boot with this command
sudo nano /boot/uEnv.txt
– Enter the name of overlay binary file(with total path) into uEnv.txt and un-comment the uboot_overlay_addr# variable that the overlay binary was assigned to
###Additional custom capes

uboot_overlay_addr4=/lib/firmware/PB-SPI1-OLEDC-CLICK.dtbo

#uboot_overlay_addr5=/lib/firmware/<file5>.dtbo

#uboot_overlay_addr6=/lib/firmware/<file6>.dtbo

#uboot_overlay_addr7=/lib/firmware/<file7>.dtbo
– Save /boot/uEnv.txt (use ctrl+o) then exit (use ctrl+x) and then reboot
sudo reboot
Step 4: Check whether the driver was invoked using dmesg
$ dmesg | tail -n10
– The ssd1351 driver should come up as shown:
$ dmesg | tail -n10

[   24.632306] fb_ssd1351 spi2.0: fbtft_gamma_parse_str() str=

[   24.632316] fb_ssd1351 spi2.0: 0 2 2 2 2 2 2 2 2 2 2 2 2 2 2 2 2 2 2 2 2 2 2 2 2 2 2 2 2 2 2 2 2 2 2 2 2 2 2 2 2 2 2 2 2 2 2 2 2 2 2 2 2 2 2 2 2 2 2 2 2 2 2

[   24.632418] fb_ssd1351 spi2.0: fbtft_request_one_gpio: 'reset-gpios' = GPIO45

[   24.632512] fb_ssd1351 spi2.0: fbtft_request_one_gpio: 'dc-gpios' = GPIO110

[   24.632571] fb_ssd1351 spi2.0: fbtft_verify_gpios()

[   24.632581] fb_ssd1351 spi2.0: fbtft_reset()

[   24.932532] fb_ssd1351 spi2.0: Display update: 521 kB/s, fps=0

[   24.936769] Console: switching to colour frame buffer device 16x16

[   24.937027] graphics fb0: fb_ssd1351 frame buffer, 128x128, 32 KiB video memory, 4 KiB buffer memory, fps=20, spi2.0 at 6 MHz
Step 5: Display image on screen
– After boot up, you should see some text displayed on screen
– Upload an image to PocketBeagle® either by dropping it into Cloud9 IDE or download it from the internet. It is recommended that the size of the image be 96×96 pixels.
– Make sure you load an image before the screen times out (approx 3 mins). If this occurs, reboot and go back to the beginning of step 5.
– Use fbi (Linux Frame Buffer Image-viewer) to display image on screen. (You may have to install this program by connecting PocketBeagle® to the internet.(https://github.com/beagleboard/pocketbeagle/wiki/FAQ#How_do_I_get_connected_to_the_Internet)
sudo fbi -T 1 -a NameofImage
NOTE: The size of the image should be 96×96 pixels for the image to display correctly.
Submitting Overlays to the
BeagleBoard.org®
Repository
If you have interfaced a new
click board™ with the PocketBeagle
®, you can contribute to the PocketBeagle® click board™ support by submitting your device tree overlay to the bb-overlays repository (
https://github.com/beagleboard/bb.org-overlays
). Link to this Hackster.io for details on how to follow that procedure and contributing to the Beagle open-source community.
https://www.hackster.io/102067/working-with-pocketbeagle-device-tree-overlays-6de395
Comments are not currently available for this post.