Categories: Intermediate
Using voice to control things in your home is one of the coolest things in home automation. It is more natural to use voice rather than keyboard or a touch screen. Wouldn’t it be fun to use a voice command to turn off lights or switch on AC or even open a door? All without leaving the comfort of your chair !
With the availability of cloud based technologies it is not as difficult as it sounds. This project demonstrates the concepts and introduces you to two powerful network based technologies –
Amazon Alexa
and
PubNub
.
Notes about the hardware used:
- These are the things I have used in this demo project but there are alternatives to them. For example, the BeagleBone Black can replaced with another Raspberry Pi (even older model like 1B), or an mbed / Arduino board. If you would like to use other device, please make sure it can run the PubNub SDK. PubNub has 70+
SDKs
supporting various languages like C, C++, C#, JavaScript, Java, Go and many more.
- Raspberry Pi needs a separate USB microphone. In-built microphone on a mobile phone headset using 3.5mm audio jack won’t work. See here –
Raspberry pi FAQ.
In fact, I used a webcam which had inbuilt microphone.
- I have also used a servo motor for demo in addition to LEDs
ACCOUNTS NEEDED
You will need the following accounts.
- Developer account on Amazon (Needs a valid credit card although the service is free for 12 months) –
https://developer.amazon.com
- Account with PubNub –
https://www.pubnub.com
- Account with Heroku (for running a web service) –
https://signup.heroku.com/dc
THEORY OF OPERATION
What is Alexa
Alexa is a voice service from Amazon which gives a Voice User Interface (VUI) to customers to interact with the world. You can ask Alexa range of questions from information about weather in your city to the distance between sun and earth. You can also ask Alexa to play music or set an alarm or timer etc. However what makes it more powerful is the ability to develop additional skills using the service. This is the Amazon Skill Kit.
Alexa skill kit is a set of API and tools which help you create your own capabilities using voice commands. There are some predefined skills like ‘Smart home skill’, ‘Flash briefing skill’ but in this project we will be using a custom skill. Using a custom skill is simpler and more flexible. It also does not need any user authentication or account linking as required by the smart home skill. You can read more about Alexa voice service and Alexa skills kit
here.
What is PubNub
PubNub is a real time data streaming network. It works on the principle of publish-subscribe. Devices publish messages to the network using a particular topic and these messages are received by devices who are subscribed to that topic. PubNub acts as a broker in this architecture to receive published messages and pass them on to subscriber devices. The device can be a mobile phone or tablet or Raspberry Pi, Arduino like board and so on. You can read more about real time data streaming networks on
this blog
by Joe Hanson and find out how PubNub works from
here.
In this project, we use PubNub for message passing from Alexa skill adapter code to the BeagleBone Black board responsible for controlling devices in the home.
With this basic knowledge about Alexa and PubNub, the following image will help understand the flow and working of this project.
You can also have a look at this
presentation on Slideshare
to get more understanding about the workflow.
GET IT GOING
Enough theory and introduction, let’s get to the execution phase. Follow the steps below.
- Create all accounts
- Get Publish/Subscribe keys from PubNub
- Get Alexa voice service running on Raspberry Pi
- Create a custom skill
- Run skill adapter code as web service
- Configure skill
- Run code on BeagleBone
- Have fun !
Create all accounts
If not done already, create all accounts required (Amazon, PubNub and Heroku).
PubNub publish/subscribe keys
Create a new app within PubNub. This will also create a demo keyset within the app. This keyset is a pair of publish and subscribe keys. We need these keys later on so copy these keys somewhere in a text file.
Publish
key is needed for publishing messages to PubNub network from the web service.
Subscribe
key is needed for code running on BeagleBone listening to messages published on a channel. Note that we don’t need to create any channel on PubNub website. Whenever a publish is done, the channel gets automatically created and other devices can subscribe to the channel.
Get Alexa voice service running on Raspberry Pi
The wiki
https://github.com/alexa/alexa-avs-sample-app/wiki/Raspberry-Pi
contains all instructions in detail with screen shots and hence I am not repeating them here. Following these steps will install the Alexa app on your Raspberry Pi and will also register your Raspberry Pi as an authenticated device to access the Alexa voice service.
A couple of things to note:
- Usage of wakeword is optional and you can always talk to Alexa by clicking on ‘Listen’ button in the sample app.
- The automated installer takes quite a lot of time especially on a fresh Raspbian install. In my case it took more than 4 hours as it downloaded a number of packages including upgrade Raspbian OS.
Once you are able to access the Alexa voice service, i.e. you got correct answers to questions you asked, you are ready to take next step for developing a skill set.
Create a custom skill
- Login on
https://developer.amazon.com/
- Click on tab "Alexa" and then click on "Get Started" button in "Alexa Skills Kit" box. Click on "Add a New Skill" button.
- Keep Language as "English (U.S.)" and select "Custom Interaction Mode" as skill type.
- Enter a descriptive name in the "Name" dialog box such as "Home automation using PubNub".
- In the "Invocation Name", enter a short name such as "My home". This is the name you will use to invoke the skill. For e.g. you will say "Alexa, ask My home to turn on kitchen light".
- Set Audio Player option to No.
- Click on "Save" button.
- Copy the application ID created as we are going to need this later. We will return to this point after creating web service on Heroku.
Create a web service
The actions our custom skill executes based on voice commands we speak, are all executed in the code running as a web service. The web service receives requests from Alexa voice service in the form of intents and slots. It processes the intents and publishes messages to PubNub network.
You can carry out these steps on your host machine running either Linux / Windows / Mac.
It is easier to work with command line interface when using Heroku.
Follow the steps in the ‘setup’ section
here
to download the Heroku CLI and verify you have correct versions of node, npm and git installed on your host system.
If not done already, checkout source code for skill adapter as web service from
GitHub.
Navigate to folder alexa-pubnub-heroku.
git clone https://github.com/gopal-amlekar/alexa-pubnub-heroku.git

cd alexa-pubnub-heroku
Login to heroku.
heroku login

Enter your Heroku credentials:

Email:

Password:

Logged in as test@xyz.com
Create a Heroku app with following commands
heroku create

Creating app... done, demo-app-96357

https://demo-app-96357.herokuapp.com/ | https://git.heroku.com/demo-app-96357.git
Heroku creates an app for you with a random name. Note this name. It also creates one git repository for the app code on Heroku. A remote reference is added to your local git repository so you can push code changes to the web app via git. Next, we need to set some configuration parameters such as PubNub publish/subscribe keys, web app route etc.
heroku config:set AMAZON_APP_KEY=

heroku config:set PUB_NUB_SUBSCRIBE_KEY=

heroku config:set PUB_NUB_PUBLISH_KEY=

heroku config:set PUB_NUB_CHANNEL_KEY=
The WEB_APP_ROUTE configuration parameter is part of the https endpoint route to which Alexa service will pass on the requests. You can choose any random name for this. In this example, the endpoint becomes
https://demo-app-96357.herokuapp.com/alexa_web_service
We need this endpoint later to configure the Alexa skill.
Also, you can choose any name for PUB_NUB_CHANNEL_KEY but it should be kept same in the BeagleBone environment as well.
Finally, depoly the Heroku web app which then starts running our code as a web service.
git push heroku master

Counting objects: 20, done. ...

Writing objects: 100% (20/20), 6.10 KiB | 0 bytes/s, done.

...

remote: Building source:

remote: -----> Node.js app detected

remote: -----> Creating runtime environment

...

...

remote: -----> Build succeeded!

...

...

remote: -----> Launching

...

remote: Released v5

remote: https://demo-app-96357.herokuapp.com/ deployed to Heroku

remote: Verifying deploy... done.

To https://git.heroku.com/demo-app-96357.git * [new branch] master -> master
Configure the skill
Skill configuration consists of 3 parts:
1. Configuring Voice User Interface
2. Mapping voice commands to intents and slots
3. Configuring Skill adapter endpoints
We need to tell our skill what voice commands are expected from user and how to match the commands to intents and slots. The skill will then process voice commands and pass on requests to our web service in the form of intents and slots. Slot is a list of additional objects in our voice command. Use of slot is optional but we are going to need this to specify the gadgets to be turned on/off.
The skill therefore needs a schema of the intents along with slots that our skill adapter can process. It also needs a list of sample utterances (i.e. the voice commands that user will speak). Alexa then tries to match the voice commands spoken to the sample utterances and map them to the intents.
- Go back to the Alexa skill you created on
https://developer.amazon.com
and edit it.
- Click on ‘Next’ or click on the ‘Interaction model’ tab.
- In the Intent schema, copy/paste contents of file ‘intent_schema.json’ from the folder skill-interaction in the checked out project from
GitHub
.
- In the Sample utterances, copy/paste contents of file ‘sample_utterances.txt’ from the same folder.
Note: The sample utterances and intent schema are in fact not needed for the web app. But I added them to this repository only for convenience.
- Click on ‘Add slot type’ button. Enter the type as ‘LIST_OF_ITEMS’ and key in following values one on each line: Drawing room Light, Bedroom Light, Garage Light. These are not case-sensitive.
- Add another slot type and enter type as ‘LIST_OF_DOORS’ and key in the value garage door there. I used only one value here but you can add more specific to your project.
- Click on Next button.
- In the configuration section, select the service endpoint type as ‘HTTPS’ and geographical region ‘North America’.
- Copy / paste the web service path created above (In this example, https://demo-app-96357.herokuapp.com/alexa_web_service) in the text box. Make sure to select the SSL certificate option there as "My development endpoint is a sub-domain of a domain that has a wildcard certificate from a certificate authority"
- Leave Account linking option to No and click on Next.
At this point, you should be able to test your skill via a simulator. In the test section, ensure that your skill has been enabled for testing. If not, something is missing and generally an error message will be shown there. Go back and correct it.
In ‘Enter utterance’ text box in Service Simulator section, enter ‘Turn on kitchen light’. This utterance will be converted by the skill to an intent and passed on to the skill adapter code. Response from the skill adapter code should be shown in the Lambda response box.
If this works fine, proceed to test the skill using voice commands. Start the Alexa app on your Raspberry Pi and say ‘Alexa Tell my home to turn on kitchen light’. You should get a voice acknowledgement like ‘Turning on the gadget’.
You can additionally test the skill by using PubNub’s debug console as well. Go to Debug console section of your PubNub app on PubNub website. Add a client with the channel name ‘alexa_world’ (or your own channel name). When you speak into the Alexa app on the Pi, you should see message published by the skill adapter in the client window.
Run code on BeagleBone Black
Let’s now fit together the only remaining piece of the puzzle. We will run code on BeagleBone Black so it subscribes to channel ‘alexa_world’ on PubNub and keeps listening to messages on this channel. Once it receives a message, it validates the message and takes necessary action to turn on /off the corresponding GPIO pin or set PWM value etc.
- A little bit of hardware work is needed. I used LEDs to demonstrate the concept. Wire up three LEDs as shown in the schematic. Also wire up a servo motor as shown in the schematic.
- Carry out the following steps on BeagleBone. Use SSH from your host machine or Raspberry Pi to log in to BeagleBone.
- Make sure you have Node.js V4 or greater running on the BeagleBone. Follow instructions
here
to update Node.js if required.
- If not done already, check out the source code for BeagleBone Black from
GitHub.
This code is also in Node.js using PubNub SDK.
- Go to the checked out folder and issue following command to install required modules. The required modules are – PubNub, dotenv and bonescript.
git clone https://github.com/gopal-amlekar/pubnub-alexa-beagleboneblack.git

cd pubnub-alexa-beagleboneblack

npm install
- Create a file named ".env" in the same folder and put in following details in that file. I used this approach instead of sharing the publish / subscribe keys in source code.
PUB_NUB_CHANNEL_KEY=alexa_world

PUB_NUB_SUBSCRIBE_KEY=YOUR_PUBNUB_SUBSCRIBE_KEY
- Execute the code on BeagleBone.
npm start

Subscribing to channel alexa_world
The app will now start listening to messages on PubNub channel ‘alexa_world’.
Now if you speak into the Alexa app ‘Turn on garage light’ or ‘Turn on bedroom light’, you should see corresponding LEDs turning on/off as per your commands.
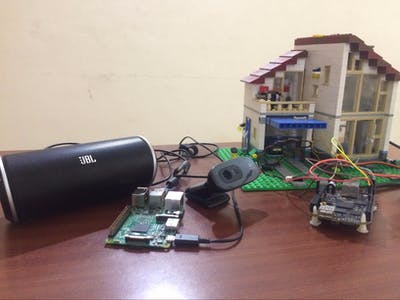
Demonstration
Do let me know if you replicate this project.
Have fun !
Comments are not currently available for this post.