Categories: Intermediate
Inside-Outside Weather Station is a great weekend IoT project, which uses the Seeed Studio BeagleBone Green to display Temperature Humidity inside and outside your home.
Here a quick video demo, of the features implement as part of the project
- Display Temperature and Humidity inside your home using the Grove -Temperature and Humidity sensor -pro version
- Get the Temperature and Humidity of you city to display on Grove LCD using
http://openweathermap.org/
- Get Weather conditions to display, so that you can plan what to wear or if you need to carry you umbrella before you head out in the morning.
- Post the temperature and humidity values to dweet.io from a data collection endpoint
- Create awesome dashboards using freeboard.io
Here are the Steps to follow
3D Print the Case for BBG and Sensors
Download the STL files attached and print. 3D printing all the part could take about 2-3 hours based on your 3D printer settings.Here are some suggested setting
- layer height – 0.3mm
- Infill – 20%
- PLA or ABS filament (in my case I choose to use white and green PLA)
Solder Bread-Boarding Wire to the Grove Connectors
Cut one of the grove connectors and solder bread-boarding wire as shown in the picture below, also add heat shrink to prevent short circuits
In addition also solder wires to the 10 k POT
Install Python Library for the Temperature and Humidity sensor
To use the code below you will have to install a couple of libraries on you BeagleBone Green
Connect a LAN cable to your BeagleBone and then connect the USB cable which comes with beaglebone green to your laptop , in my case I have dell laptop running Ubuntu.
I prefer SSH’ing into the BeagleBone ,instead of using cloud9 ide , use the following URL to access in you faviorite browser –
http://192.168.7.2:3000/ide.html
You can run all the command below using the cloud 9 ide, for example to get the ip address assigned to you BBG use
root@beaglebone:~# ifconfig
Now you can use the ip address to SSH into your BeagleBone using
ssh root@ipAddress
run the following commands
root@beaglebone:~#sudo apt-get update
root@beaglebone:~#
sudo apt
–
get
install build
–
essential python
–
dev python
–
openssl
Once done download the awesome Adafruit DHT library from github and install it
root@beaglebone:~#git clone https://github.com/adafruit/Adafruit_Python_DHT.git
root@beaglebone:~#cd Adafruit_Python_DHT
r
root@beaglebone:~/Adafruit_Python_DHT
#sudo python setup.py install
For more info refer the guide on the Adafruit learning system at
Test the Temperature and Humidity Sensor
Connect the Sensor to
P8_11 pin
on BeagleBone to the temperature and humidity sensor.
Run the following simpletest.py program to get the reading for temperature and humidity in your room
root@beaglebone:~/Adafruit_Python_DHT# cd examples/
root@beaglebone:~/Adafruit_Python_DHT/examples# python simpletest.py
Note : If you are using the same sensor as I am, you will have to uncomment the line in the simpletest.py file
sensor = Adafruit_DHT.AM2302
Install Python Libraries & get OpenWeathermap API Key
Run the following command to install the Open Weather library
root@beaglebone:~#
sudo pip install pyowm
Now create an account at
http://openweathermap.org/
to get the API key to use as part of the code
For more info refer
pyowm wiki at
https://github.com/csparpa/pyowm/wiki/Usage-examples
Getting Weather of your City
Now download the code openWeather.py attached and run it (if you are using ssh use
nano openWeather.py
and copy paste the code)
Modify your city name and API key as part of the code
root@beaglebone:~# python openWeather.py
In addition to post data to dweet.io you will need to install Requests library
root@beaglebone:~# apt-get install python-requests
Complete the Circuit
Complete the circuit as shown in the circuit digram below
– Connect the Temperature and Humidity sensor to P8_11
– Connect the LCD to the I2C pins on the BBG,
- SCL to P9_19
- SDA to P9_20
- connect the Vcc to the 5V pin (if you connect this to the 3.3v pin you will not see the text appear)
– Connect the POT to P9_33 and red wire to P9_32 and black wire to P9_34, here note the analog voltage on the BBG is 1.8V
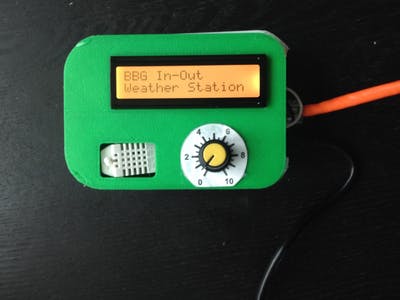
Add the BBG and Sensor to 3D Printed Parts
Now use your hot glue gun to add the sensors to the 3D printed parts
Also get a fancy potentiometer knob to add to the POT.
Print the image attached below and stick it the 3D printed part, just below the POT, you may have to adjust the values of the pot in you program below, run the analogRead.py program to determine the value of the POT at each spot.
Upload the Code to the BBG
Now download the code
weatherStation.py
attached below and run it (if you are using ssh use
nano
weatherStation.py
and copy paste the code)
- Modify your city name
- API key from Openweathermap.org
- And for posting to dweet.io change the appName with you city/town
root@beaglebone:~/Adafruit_Python_DHT/examples# python weatherStation.py
Run the Python Program on start of BBG
To run the program at startup instead of SSH’ing in all the time, edit the Crontab file using
root@beaglebone:~# crontab -e
and add the line below to the file, and use ctrl+X ,then Y-to save.
@reboot python /root/
Adafruit_Python_DHT/examples/
weatherStation.py
&
Now when you reboot your BBG the program will auto start.
Create Dashboards on Freeboard.io
freeboard.io is intuitive, when it comes to creating dashboards using dweet.io as your datasource, which in my case is (http://dweet.io/follow/BBGTorontoCanada)
Here are few screenshots
Comments are not currently available for this post.