Categories: Intermediate
Our team was challenged to build a portable robot to demonstrate that the
OSD335x System-In-Package
can address the needs of industrial control, automation and robotics applications. For the full story and more information about the design go to our blog:
Industrial Control Exemplified: An OSD335x Powered Rubik’s Cube Solving Robot
We chose
BeagleBone® Blue from Beagleboard.org
since it showcases the industrial robotic control features possible
with the OSD335x System-In-Package.
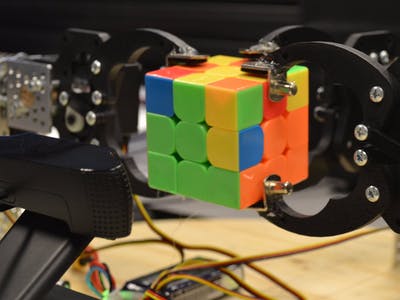
Building the Arm Assemblies:
We built three arms to execute all the movements. This also frees up one side of the cube so that a camera can easily capture the images.
Use the Actobotics building system for the arm construction. A wooden dowel added stability to the design.
Each arm has 2 Hitec (HS-422) servo motors:
- One to open and close the “hand”, which holds the cube and interfaces easily with the Actobotics gripper kits
- The second is used to operate the “wrist” which will rotate the cube both 90 degrees clockwise and 90 degrees counter-clockwise.
Use a wooden base board to mount all the arms and the camera at fixed positions. While debugging, use a hot glue gun to experiment with the positioning of the arms.
Adding the Camera:
We chose the Logitech C920 camera to capture and identify the colors on each side of the cube and will use OpenCV for Computer Vision tasks.
Due to the configuration of the camera and arms, the camera cannot actually ever see the left and right faces of the cube. Therefore, we developed a series of moves that allows the camera to scan the tiles on the left and right sides of the cube.
Software Overview:
The following software packages were utilized in the design. For more information regarding the development of the software and decisions needed, please visit our blog:
Industrial Control Exemplified: An OSD335x Powered Rubik’s Cube Solving Robot
- Open CV
- Cube Explorer 5.13 using Kociemba’s Algorithm
- Motor Control Libraries for BeagleBone Blue
- Cloud9 IDE
Software Preparation:
Use SD card (> 8GB) for easy porting of demo from one board to another. Make sure the board is connected to the internet for the following instructions.
1. Setup Python OpenCV – Python2 and Python3
sudo apt-get update

sudo apt-get upgrade

sudo apt-get install build-essential cmake git libgtk2.0-dev pkg-config libavcodec-dev libavformat-dev libswscale-dev

sudo apt-get install python3.5-dev

sudo apt-get install python3-pip

sudo pip install --upgrade pip

sudo pip install numpy

python3.5-config --includes

mkdir opencv_build

cd opencv_build

git clone https://github.com/Itseez/opencv.git

mv opencv to opencv-3

cmake -D CMAKE_BUILD_TYPE=RELEASE -D CMAKE_INSTALL_PREFIX=/usr/local ../opencv-3

make

sudo make install
2. Re-install robotics cape library with a change in libraries/other/rc_pru.c
- Clone roboticscape (version 0.3.4):
git clone https://github.com/StrawsonDesign/Robotics_Cape_Installer
- Modify libraries/other/rc_pru.c: change bounds for servo pulse from +/- 1.5 to +/- 2 in function rc_send_servo_pulse_normalized
- Modify install.sh: line 40 from “if ! grep -q "8." /etc/debian_version ; then” to “if ! grep -q "9." /etc/debian_version ; then”
- Uninstall current version of the Robotics cape
cd <path of cloned Roboticscape>

./uninstall.sh
- Install the modified Roboticscape library
./install.sh
3. Install rcpy package
sudo pip3 install rcpy
4. Download the Demo code and install it
- Download the demo code onto Beaglebone Blue and unzip. From here on the path where the code exists will be referred to as <path>
Install Rubik’s cube Solver:
- Download the cube solver from
https://github.com/muodov/kociemba
- Un-zip and change current directory to <path>/cube_solver/
- Modify example.py to use method 1 described in the file(i.e, change the comment location).
- Generate initial solving tables
python3 example.py
5. Running the demo:
After the demo completes setup, it waits for the mode button on the Beaglebone Blue to be pushed. It starts scanning the cube after the button is pushed.
cd <path>/cube_solver

sudo PYTHONPATH=. python3 ../solve_rubiks_cube.py -v
Setting up BeagleBone Blue
- Insert SD card containing demo image
- Insert servomotor control cables of 6 motors of arms into corresponding Beaglebone Blue servo control channels
- Power the Beaglebone Blue with 12V adapter
- Connect the battery to JST connector
- Connect the Beaglebone Blue to a laptop using the USB to Micro-USB cable
- Connect the camera to the Beaglebone Blue
Alignment, Calibration and Execution
- Place LED light strip at a place the light illuminates the front face of the cube
- Build a canopy around the base board to minimize light interference from surroundings
- Image alignment of the cube face with the camera
- Running the demo:
cd <path>/cube_solver

sudo PYTHONPATH=. python3 ../solve_rubiks_cube.py -v
After the demo completes setup, it waits for the mode button on the Beaglebone Blue to be pushed. It starts scanning the cube after the button is pushed.
- All the images from the camera are stored in <path>/cube_solver/cube_alignment.png. Make sure the software generated square green boxes align with the blocks of the cube’s face
Optional color calibration:
- Run the demo code as described in step ‘f’ of Prepare Software
- If the robot is unable to determine the color of a block, it will display it as ‘X’ on the terminal. The robot continues to rescan the cube face until it recognizes all the colors on the cube’s face. If the robot is unable to determine a color, stop the demo and modify the variables RGB_POINT and LAB_POINT in the file <path>/image_processing/read_rubiks_cube.py according to values displayed on the terminal during the unsuccessful attempts to scan the cube
Run the code to solve the cube"
cd <path>/cube_solver

sudo PYTHONPATH=. python3 ../solve_rubiks_cube.py -v
After the demo completes setup, it waits for the mode button on the Beaglebone Blue to be pushed. It starts scanning the cube after the button is pushed.
We hope you enjoyed building this Rubik’s cube solving demo as much as we did in the lab at Octavo Systems.
Rubik’s cube solver Version 2
The updated version of Rubik’s cube solver code can be found in the attachments. It has the following additional functionlities:
- Ability to pause the scanning or solving of the Rubik’s cube
- Ability to tweet after a solve. The tweet contains the time it took to solve the cube and an image with the initial state of the cube and the moves required to solve it
The tweeting functionality requires two additional python packages.
- python-twitter (
https://github.com/bear/python-twitter
)
- pillow (
https://github.com/python-pillow/Pillow
)
Before running the code for version 2, install both of these packages using pip3 and modify solve_rubiks_cube.py to input consumer keys and access tokens that can be generated by logging into the twitter account you want the solver to tweet and creating an application (
https://apps.twitter.com/app/new
) and generating the access tokens in the keys and access tokens tab.
Contact us
to solve the puzzles in your Industrial Control Systems designs.
Comments are not currently available for this post.