Categories: Intermediate
Maybe you like to write music. Maybe you’re at the mall and you’ve just thought of a really amazing riff and you know you’ll be upset if you forget it later. Maybe you look for
the right apps to get your song out
, but none of them allow you to put in background music that isn’t just pure tones or your own voice, and you’ve got an idea for the whole band.
For all those inconvenient times that inspiration strikes, keep your
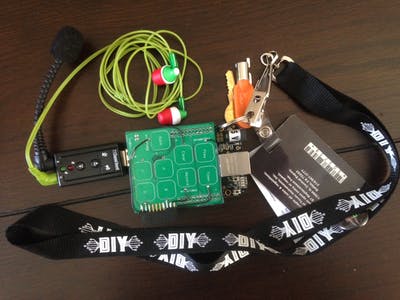
Keychain Synth
handy. It’s better than a smartphone app because you can simultaneously attach:
- A midi keyboard
- A microphone
- Speakers
- A roll-out keypad (in case the on-board keys are too small)
- Wearables (in case you want to show off at a party)
This synth is customizable and convenient for any on-the-go composer.
This is how you make one.
STEP 1: Get a BeagleBone Black
The BeagleBone Black (BBB) has a 1 GHz processor, so it’s powerful enough to have a full synthesizer program running at all times when it’s on. Once completed, it’ll have a looper and digital instruments running constantly, so this is really important. The 4 GB of memory it has also makes it really conducive to storing a lot of different sound files inside, to make the range of instruments playable on the synth as diverse as you like.
STEP 2: Get software on the BeagleBone Black
To do this, first we need to get it set up. Check out
this YouTube video
to see how to do that, and also get access to the internet through the BBB.
Then follow steps 3 and 4 on the
Make tutorial
, which tells you how to install Pure Data (for FREE) and set up your USB sound card. Grab the software files from this page and put them in the same place you downloaded the files from the tutorial (probably under /root/). Make sure the python script has a .py extension and that the Pure Data script has a .pd extension.
Then get whatever files you want to be able to play on your synth and put those in the same folder as well, labeling them by number. The Pure Data program on this page will call them up (until number 9 – after that you have to add on more sound bits on the Pure Data program) every time the corresponding buttons are pressed.
Disclaimer: Our Pure Data file is just a modified version of the tutorial’s file so there’s more than just the looper – we added more buttons, one of which is a "bank" which chooses what sounds will play from each key. Same with our python file – we just added more buttons to more GPIO pins.
STEP 3: Get your hardware
I really like capacitive touch buttons. They’re super cool and also don’t make a lot of noise, so as long as I’m not singing into the mic and have headphones in, I can compose silently and not be bothering anyone. They also make the synthesizer less bulky.
The board and schematic files are on this page, and you can modify them as you like. If you’re happy with how our board looks, feel free to message me and I’ll send you one. The whole thing is 2.25"x2.50".
If you don’t want to do that, though, you can always use a breadboard to connect regular buttons to the following inputs (you’ll need
this pinout diagram
):
- Bank: GPIO1_16 (so is this one)
- Key A: GPIO1_17
- Key B: GPIO1_18
- Key C: GPIO1_19
- Key D: GPIO1_20
The ones not labeled as toggle buttons (which is to say tap-on-tap-off) are all momentary (only on when your finger is touching it). The schematic for every button is shown below. To get cap-touch buttons on your breadboard, you can use Adafruit’s Momentary and Toggle breakout boards and remove the 1 kOhm resistor from the circuit.
STEP 4: Enable Linux Controls and Run the Software
SSH into the BeagleBone using XMing (or whatever your operating system uses) once the buttons are all connected. Then do the following to import all the necessary buttons:
cd /sys/class/gpio
echo 44 >exportode>
echo 45 >export
… go all the way until
echo 52 >export
ls
and then check to make sure the folders gpio44 through gpio52 exist. Finally, type in
pd -oss &
and once Pure Data opens, use File->Open to open up the Pure Data file from this page. Go back to the command line and type in
python pythonCode.py
where pythonCode is whatever name you gave the python script.
Now, when you play with the synth, it should work perfectly with just the cape, microphone, and headphones.
STEP 5: Get the synth to boot on startup
Now you can set up the synth to run without having to go through command line every time. To do this, make a new file called
startup.sh
in the root directory of your BeagleBone Black. Open it up and type in:
pd -oss -nogui /root/PDFILE.pd &
sleep 10
python /root/pythonCode.py &
Save that. In the command line type in
crontab -e
and at the end of the file add the line
@reboot sh /root/startup.sh
and once done do a Ctrl-O and then a Ctrl-X. You’ll get back to the command line. If you reboot the BeagleBone Black then the synth will work automatically.
Warning: If you want to make any changes to the BeagleBone Black after this step is done, UNDO THIS LAST STEP. That is to say, type in
crontab -e
and at the end of the file delete the line
@reboot sh /root/startup.sh
and once done do a Ctrl-O and then a Ctrl-X.
Congratulations! Now you have a Keychain Synth.
Other things you can do with the Keychain Synth
The basic Keychain Synth is good for what it’s marketed as: a convenient handheld synthesizer for when you don’t have access to other instruments or space to put them. But it can also be used when you do have space, to create even more amazing music with add-ons. Here are some ideas:
Paper keyboard
The buttons on the cape are pretty small, and they have to be to be functional. But if you have room for two sheets of paper you can carry this around with you! It requires a slight modification to the cape, but nothing that can’t be handled.
Cuff/Wristband
I did the same thing here as before: I took a piece of paper, glued some aluminum foil onto it, stripped the ends of a wire, taped one end to the aluminum foil, and soldered the other end to a connector. Then I just folded the paper, poked some holes into the ends of the cuff, and secured it with a rubber band so it would fit over a person’s hand and rest on their wrist.
If you connect the wristband to the "Bank" pad on the cape, then you can just hit it to play the drums and change sound sets. Connecting it to "Record" means you can sing acapella loops without having to look for the record button every time. And so on.
Glove/Vest/Other wearables
For these just do the same as before: put the pads in the appropriate places, wire them up, and connect them to the cape.
Stay Tuned for more!
So this project was started for the DIY with TI Intern Edition challenge, but I’ve always meant to create a synthesizer. Up until here is what Team Sunshine (that is to say Ashish, Jeff, and I) have made so far. Below are my plans to enhance the synthesizer after the competition.
Change the Cape
The next time we make this thing, we’ll probably add some LEDs so we know when the keys are on and when they’re off (because while recording we realized we don’t actually know when we were recording. Derp). Additionally we’ll need to add some sort of LED screen so we know what set of sounds Bank has given each key.
We’ll also definitely change the capacitive touch buttons so they need less chips and so need less board space. For example,
Texas Instruments’ FCD1004
can have up to four capacitance sensors on each chip, so all the keys for the sounds could just run on one of those.
Attach a Midi Keyboard
We have a midi keyboard we could hook up to the synth to add to the music. This requires a slight adjustment in code we haven’t spent time figuring out yet, but the keyboard has a mini-USB plug that fits into the BeagleBone Black.
Comments are not currently available for this post.