Categories: Beginner
I have recently made several projects that make use of the
Makey Makey
‘s touch sensitive controls. In this tutorial I will walk you through the steps for building this circuit along with the template code for this type of circuit. You will be able to add this code to almost any
BeagleBone Black
or
WF32 LabVIEW
VI and it will allow you to build custom physical controls to supplement your user interface. For more tutorials like this one check out my "
DIY Makey Makey collection
".
Step 1: Materials
Hardware
- 6 – 1 MΩ resistors
(Everything except the WF32 is included in the
LabVIEW Interactions Part Kit
)
Software
Step 2: WF32 Circuit Setup
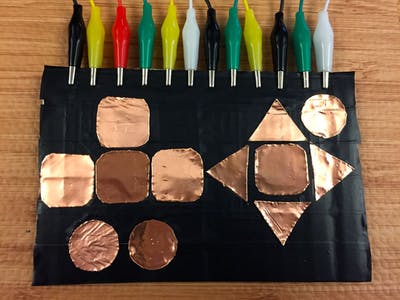
First, connect the 3.3V pin on the WF32 to the positive bus on one side of your breadboard and then connect the negative bus on the same side to the ground (GND) pin. Next use header pins to attach 12 gator clips to your breadboard on the opposite side of your breadboard.
Next, run 2 1MΩ resistors in series from each of the gator clip connections to the voltage bus. Then, connect each strip connected to a gator clip to an analog input on the
WF32
. Finally, use a grounding strap to connect ground yourself by connecting it to the ground bus.
Finally, use a grounding strap to connect ground yourself by connecting it to the ground bus.
This circuit works as a voltage divider (simple drawing shown at the bottom of the picture above), with one of the resistors (R1) being the 2 1MΩ resistors in series and the second resisor (R2) is the resistance of your body. The Switch shown above is closed when you complete the circuit. Let’s say you hooked the gator clip to a banana when you touch the banana you are closing the switch and lowering the voltage read by the analog in of the
WF32
(Vo). In the next step I will show you how to use
LabVIEW
to detect this drop in Voltage.
Step 3: BeagleBone Black Circuit
First, connect the 1.8V pin(Pin 78) on the
BeagleBone Black
to the positive bus on one side of your breadboard and then connect the negative bus on the same side to the ground pin (Pin 80). Next use header pins to attach 7 gator clips to your breadboard on the opposite side of your breadboard.
Next, run 2 1MΩ resistors in series from each of the gator clip connections to the voltage bus. Then, connect each strip connected to a gator clip to an analog input on the
BeagleBone Black
. Finally, use a grounding strap to connect ground yourself by connecting it to the ground bus.
Finally, use a grounding strap to connect ground yourself by connecting it to the ground bus.
This circuit works as a voltage divider (simple drawing shown at the bottom of the picture above), with one of the resistors (R1) being the 2 1MΩ resistors in series and the second resistor(R2) is the resistance of your body. The switch shown above is closed when you complete the circuit. Let’s say you hooked the gator clip to a banana when you touch the banana you are closing the switch and lowering the voltage read by the analog in of the
BeagleBone Black
(Vo). In the next step, I will show you how to use
LabVIEW
to detect this drop in Voltage.
Step 4: WF32 LabVIEW Code
When you touch one of the buttons while watching the wristband the voltage read by its analog channel will drop significantly. By setting a threshold voltage to 2.5 volts you will be able to tell when one of the buttons has been pressed. There are many uses for this circuit, in one of my other tutorials "DIY Makey Makey using a WF32 and LabVIEW" I use LabVIEW to allow this circuit to control my computers keyboard and mouse. The code below is a simplified version. You can add this code to any VI and then replace boolean controls on the front panel with one of these 12 local variables.
In the LabVIEW code above I use an analog read to get the voltage values from each of the analog inputs on the WF32. I then check to see if the Voltage is less than a certain threshold value. On the front panel, I set my threshold value to 2.5. This is because I know that when I touch the button and complete the circuit the value will drop below 2.5, the boolean output value will then become true.
Step 5: BeagleBone LabVIEW Code: Part 1
First download the "BBB_Makey_Makey_template" file and unzip it, next download the "BBB_Makey_Makey_template_project" and add in the Vi’s from the first download. Before you open the individual VI’s you will need to change the IP address shown to the specific IP addresses of your BeagleBone Black. To do this right click on the Beaglebone Black and select "properties".
Change the IP address in the input that says "IP address/DNS name". Once the IP address is correct right click each and select connect, this will open a connection to each device.
Step 6: BeagleBone LabVIEW Code: Part 2
First open "BBB_Makey_Makey" VI under the "My Computer" category. Before you can deploy you will need to change some things on the front panel. First, input your computers IP and then add the WAV files that you want to play.
Above you can see the Block Diagram for this VI, this while loop uses a UDP read to collect the data sent over from the BeagleBone. To end this code, we press the stop button which will exit both the inner loops, then when it’s out of the outer while loop we close the UDP socket.
Next, open the "BBB_template" VI under the BeagleBone Black category. Before you can deploy you will need to change some things on the front panel. First, input your computers IP and then you have the option to adjust the threshold to make it more or less sensitive.
Above is the block diagram for this VI, the first block is a LINX open. It is set to Local I/O because we are using a BeagleBone Black and the code that you write in LabVIEW actually gets deployed to the board. After LINX is opened it opens a UDP socket and then enter the while loop. A digital read inside the loop get data about the voltages and then it is all bundled and UDP write sends it to your computer over Wi-Fi. Once the stop button is pressed we leave the loop and close the LINX reference as well as the UPD socket.
Step 7: The End
Thank you for reading my tutorial, if you are interested in making this project yourself but don’t have the right supplies you can purchase the LabVIEW computing kit for the
BeagleBone Black
or the
WF32
. This kit includes a copy of
LabVIEW 2014 home edition
and everything you will need to run
LINX 3.0
and start making projects. Also make sure to check out the
Makey Makey
, sure to provide hours of entertainment. Please comment with any questions or comments you may have. For more tutorials like this one check out my "
DIY Makey Makey collection
".
Comments are not currently available for this post.