Categories: Beginner
Hello,
This is an actually good story that went off on the wrong way at first but ended slightly different, i.e. hence this post.
…
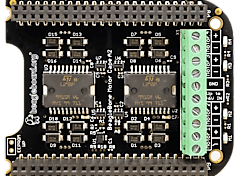
I bought a MotorCape from Mouser.com. I could not get this thing to work. I was doubting my programming methods and ideas. And then, I complained, questioned others, and began to become a nuisance to companies like
Mouser.com
and the mfg. of this awesome Cape, i.e. the MotorCape. GHI is the mfg. and they are based somewhere in the northern part of the USA.
Anyway, w/ the help from #beagle on Freenode, some helpful people at https://forums.ghielectronics.com, and the blind eye of me, we all got this Cape to work.
…
I was confused about the schematic and the ideas revolving around the power supply to the BeagleBone Black Wireless. I was applying power via USB or sys_5v instead of by barrel jack or vdd_5v. USE THE BARREL JACK! Lesson learned. Program first and then shutdown your system, the BBBW, then unplug the USB cable, and finally it will be time to plug in your BBBW via BARREL JACK. Sorry for yelling in typing. It is very important to not plug the USB and Barrel Jack in at the same time. Just one at a time will do.
…
Okay. Now, onto the fun part.
…
Stick the MotorCape onto your BBBW. Make sure that P8 and P9 line up well enough so that you do not damage your access pins/header pins.
Although that is trivial, be careful. Make sure the P8 on the Cape equals P8 on your BBBW. And, ultimately, make sure the P9 header of the Cape goes to the P9 header on the BBBW.
…
So…
Now…we need to write some software, create a.service file for our systemd system, and use chmod to create an executable file for our Python file we plan to run on boot. So, when the board boots, our BBBW w/ the MotorCape, the.service file should make our system understand that the motor (12v or 6v) needs to listen and start to turn.
Currently, I am using a Dayton 12v geared motor. So, this thing will not take off once it starts at my command, i.e. well, the.service file command once the board boots.
So, let us now do something nice to the board. Enough theory and ideas.
…
#!/usr/bin/python3


# w/ help from #beagle on Freenode


from flask import Flask, render_template

import Adafruit_BBIO.GPIO as GPIO

import Adafruit_BBIO.PWM as PWM

import time


class Motor:

   def __init__(self, dir_pin, pwm_pin, pwm_freq):

       self.dir_pin = dir_pin

       self.pwm_pin = pwm_pin

       self.value = 0

       PWM.start(pwm_pin, 0, pwm_freq)

       GPIO.setup(dir_pin, GPIO.OUT)

   def set(self, value):

       assert -100 <= value <= 100

       if (value < 0) != (self.value < 0):

           # changing direction

           PWM.set_duty_cycle(self.pwm_pin, 0)

           GPIO.output(self.dir_pin, value < 0)

       PWM.set_duty_cycle(self.pwm_pin, abs(value))

       self.value = value


motor1 = Motor(dir_pin="P8_18", pwm_pin="P9_16", pwm_freq=2000)

#motor2 = Motor(dir_pin="P8_16", pwm_pin="P9_14", pwm_freq=2000)

#motor3 = Motor(dir_pin="P8_14", pwm_pin="P8_13", pwm_freq=2000)

motor4 = Motor(dir_pin="P8_26", pwm_pin="P8_19", pwm_freq=2000)


app = Flask(__name__)

@app.route("/")

@app.route("/<state>")


def updates(state=None):

    if state == "F":

        motor1.set(100)

        motor4.set(100)

        time.sleep(.2)

    if state == "L":

        motor1.set(0)

        motor4.set(85)

        time.sleep(.2)

    if state == "R":

        motor1.set(85)

        motor4.set(0)

        time.sleep(.2)

    if state == "S":

        motor1.set(0)

        motor4.set(0)

        time.sleep(.2)

    if state == "REV":

        motor1.set(-75)

        motor4.set(-75)

        time.sleep(.2)

    if state == "REV_L":

        motor1.set(-75)

        motor4.set(0)

       time.sleep(.2)

    if state == "REV_R":

        motor1.set(0)

        motor4.set(-75)

        time.sleep(.2)

   template_data = {

       "title" : state,

   }

   return render_template("boboIV.html", **template_data)


if __name__ == "__main__":

   app.run(host="0.0.0.0", port=5000, debug=True)
This runs motors, two 12v geared motors, at different speeds w/ the LED on the MotorCape turning from lit to dimmer. This software also runs motors backwards, makes them stop, and runs them back-left and back-right.
<!DOCTYPE html>


<html lang="en">

<head>

 <title>{{ status }}</title>

 <meta charset="utf-8">

 <meta name="viewport" content="width=device-width, initial-scale=1">

 <link rel="stylesheet" href="https://maxcdn.bootstrapcdn.com/bootstrap/3.3.7/css/bootstrap.min.css">

 <script src="https://ajax.googleapis.com/ajax/libs/jquery/3.3.1/jquery.min.js"></script>

 <script src="https://maxcdn.bootstrapcdn.com/bootstrap/3.3.7/js/bootstrap.min.js"></script>

</head>

<body>

<div class="jumbotron text-center">

 <h1>MotorCape and BBBW!</h1>

 <p>This is a quick example on making motors move!</p>

</div>

<div class="container">

 <div class="row">

   <div class="col-sm-4 text-center">

     <h3>Agent One</h3>

     <p>More text and fun makings in life...</p>

     <p>Get ready to control some motors!</p>

   </div>

   <div class="col-sm-4 text-center">

     <h3>Agent Two</h3>

     <p>This bunch of online buttons will make your motors move</p>

     <!--  <img src=" http://0.0.0.0/?" "action=stream" alt="Unable to get video feed" width="300" height="300"> -->

     <a href="/F" id="on" class="button">FORWARD</a>

     <br><br>

     <a href="/L" id="on" class="button">LEFT</a>

     <a href="/R" id="on" class="button">RIGHT</a>

     <br><br>

     <a href="/S" id="on" class="button">STOP</a>

     <br><br>

     <a href="/REV" id="on" class="button">REVERSE</a>

     <br><br>

     <a href="/REV_L" id="on" class="button">REVERSE_L</a>

     <a href="/REV_R" id="on" class="button">REVERSE_R</a>

   </div>

   <div class="col-sm-4 text-center">

     <h3>Agent Three</h3>

     <p>I hope you had fun controlling your motors!</p>

     <p>Two, DC  motors, a 12v battery, and a BBBW w/ MotorCape!</p>

   </div>

 </div>

</div>

</body>

</html>
I got some of this software from
w3schools.com
online at their site. Use this .html software under the dir. templates in your first dir. So, for example, the dir. would be your first dir. (call it directoryOne) and the templates dir. would be in that directoryOne directory. Like so:
/directoryOne/templates/
…
Now…onto our.service file.
In the /etc/systemd/system directory, make a.service file and you can call it what you desire as long as it ends w/ a.service file name. For instance, if our Python software was called new.py, we could then call our.service file
new.service
for noticeable ideas.
…
So, now we are on to typing up a.service file and then enabling and starting the.service file. We will show the status of this file, too! This will make sure we have done the whole shebang correctly.
Oh and notice the shebang, speaking of shebangs, and file path at the beginning of the.py file. That is there to make sure the file can be turned into an executable by using chmod as a command in our shell/terminal.
Okay. Please remember the /etc/systemd/system directory from before. We now need to move to that directory. Once in that directory, we need to set up a.service file. The whole reasoning for starting a file on boot.
So, pick your favorite editor or just use nano. So, the command would be something like this: sudo nano new.service. Once in the editor, type your ideas and make them reality. Some background reading would be nice, right? Here it is:
https://www.freedesktop.org/software/systemd/man/systemd.unit.html#Examples
will show you some examples w/ explanations. The above text gives more insight.
…
Here is the file that needs to be produced in our
new.service
file:
[Unit]

Description=Making my Motors Turn

[Service]

ExecStart=/home/debian/new.py

[Install]

WantedBy=multi-user.target
Save this file in your editor and we can begin to enable, start, and get the status of our.service file.
So, now we will use systemctl commands to enable our.service file.
sudo systemctl enable new.service

sudo  sytemctl start new.service

sudo systemctl status new.service
Those three commands can be performed but only after you use this command to make your
new.py
file an executable: sudo chmod a+x new.py.
…
Notice the last systemctl call named status. Once the file has been made executable by chmod and the enable and start systemctl calls have been performed, you will see the "status" of your new.service file. No puns intended.
…
Now! Shutdown your system w/ sudo poweroff or sudo shutdown -h now. Once your LEDs on the BBBW stop blinking and the power LED shuts off, unplug your machine (the BBBW) by the USB.
…
Now, plug in your machine, the BBBW, by way of 5v barrel jack!
Wait for it! What did it do?
Seth
P.S. Did the LED for MotorOne turn on and go from lit to dim? Did the motor move? Also, look to the end for ideas on servers w/ Flask, HTML, and Python. Look here for more:
https://github.com/silver2row/motocape.
Comments are not currently available for this post.