Categories: Beginner, Education
Motivations
As a new plant parent, I unfortunately often forget to water my plants, or incorrectly place my plants in spots with too little or too much sunlight. At times, I wished that there was some way my plant could let me know it needed water or more sun, which was my motivation for this project.
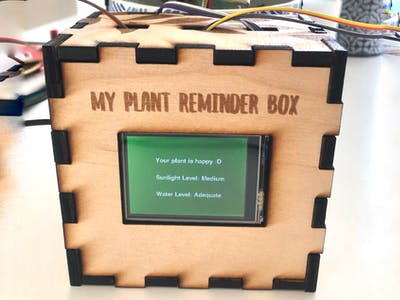
To hopefully extend the life of my plants and perhaps yours, I created this plant reminder box that texts the plant owner if their plant needs water or needs a different amount of sunlight. Additionally, the box has a screen that displays the plant’s sunlight and water levels, so that the plant owner can ‘check in’ on the plant visually. This way, there’s really no excuse for me or you to not have a green thumb!
Overview: System and Power Block Diagrams
Connecting to Wifi
Hardware
In order to be able to send texts from the box, I needed to connect to wifi. I used a micro-usb breakout board and plugged in the wifi adapter. Throughout the project, I had some trouble connecting to wi-fi through my phone’s hotspot, then realized that I needed to have my hot-spot window open whenever I booted up the PocketBeagle. On the PocketBeagle itself, I soldered pins VBUS (P1_5) and VIN (P1_7) together and the pins ID (P1_13) and GND (P1_15) together to connect the microUSB board and the wifi adapter to the USB1 bus.
Software
Once the adapter was connected, I needed to connect to wifi using the cloud9 portal. This was done using the connmanctl commands below. Again, if I wanted to connect to my phone’s wifi, I needed to have my phone’s hot spot window open when I scanned for wifi. Another issue I encountered was that I was unable to turn agent on in non-interactive mode, so I had to create an error field for not being able to connect to wifi in my code.
Sending Texts through PocketBeagle
To send texts through the PocketBeagle, I needed to make sure I was connec
ted to wi-fi, and I also had to log-in to my email using the smptlib library to connect to the gmail server.
To allow this, I had to manually log in to my gmail and allow for third party apps to log in to my email, since I got a few alerts from gmail that a device was attempting to log into my email. I also had to create an error field for this case as well. Below are some helpful instructions and code for sending texts:
Soil Humidity and Light Sensor Measurements
Soil
Humidity
Sensor
Once I had the wifi and texting interface set up, I used a soil humidity sensor to monitor the water levels of the plant. I used the I2C pins on the board to connect to the sensor, and also needed a four-pin connector. The pinout is shown in the frizzing diagram below. The sensor takes in both humidity and temperature measurements, but I only used the humidity aspect for this project. The sensor measures humidity based on a capacitive value, and through some tests with my own plant, I found that the value of the plant once it had been watered was at least 580, so this is what I set the minimum value as in my code.
Below is some sample code that sets up the I2C pins and outputs the moisture and temperature measurements in real time.
Light
Sensor
For the light sensors, I decided to take their output values and average them to get a more accurate singular reading by placing them on different sides of the plant. The sensors outputted analog values, so I used two of the Ain pins on the BeagleBoard. The pinout is shown in the frizzing diagram below. The light sensor measures light using millivolts, and by researching the amount of sunlight needed for a regular house plant, I found that the range was between 1000 and 2000 mV. Values higher than this were too much sunlight exposure, while values lower than this range were not enough exposure.
Below is some example code that sets up the ADC bus, takes in both sensor values, and averages them.
Displaying on LCD Screen
Hardware
First, I soldered the IM1, IM2, and IM3 pins together so that the screen would be able to connect to the PocketBeagle’s SPI bus.
Next, I connected pins Vin, GND, CLK, MISO, MOSI, CS, and D/C on the LCD screen to the PocketBeagle shown in in the frizzing diagram below.
Software
In order to display the water and light levels, I needed to configure the TFT LCD screen. I used the PocketBeagle’s spi board and imported some helpful libraries, including:
- Circuit Python
- Displayio
- Digitalio
- PIL
- Adafruit_BBIO
- Terminalio
- Adafruit_display_text
All of the libraries I imported for the display are included in my code below, and this is what I found as the most helpful reference for connecting the screen:
https://www.adafruit.com/product/2090
and this is what I found as the most helpful reference for displaying text:
https://learn.adafruit.com/circuitpython-display-support-using-displayio/text
When I first started playing around with it, I was able to display an image that I had import into my project folder on the cloud9 portal.
Here’s some code for that, in which
purple.bmp
is the image. First, I import the correct libraries.
Next, I set up my SPI bus and the CS and DC pins on the PocketBeagle, which are shown in the frizzing diagram below. I import the image from the folder I am currently in, set up my display, and then show my image.
Though my project does not involve displaying an image, it was crucial for me to understand how using the LCD screen works and how to display text later.
In terms of displaying text, I had to import some additionally libraries than in the code below, including Adafruit_display_text.
Here is the function I used to set up a background color and to display text on the screen, once I had imported the correct libraries.
Since the wifi connection and the email login features were a bit finicky, I set up an error field on my code so that the screen turns red on boot up if something is wrong.
Lastly, I build a small box for the device, and the.ai file can be found at the end of this post. Here’s some pictures of the device before and after being placed into the enclosure.
Future Plans
Some components I would like to add to this project are:
- A feature for the plant owner to input their phone number, email, and passcode within the display, at the moment, the user can set this within the code below
- A feature to change how often texts are sent and how often the display is updated
- A feature for the plant owner to set what kind of plant they have, and for the soil humidity and sunlight standards to be different depending on the plant
Final Video
In conclusion, the user only needs to set up email and phone number settings in the code once the GitHub repository is downloaded and make sure the PocketBeagle is connected to internet. Once connected, the device will start to run. The device will display the water levels and the light levels of the plant, and will text the user accordingly.
Comments are not currently available for this post.