Categories: Beginner
What is the PocketBeagle?
No,
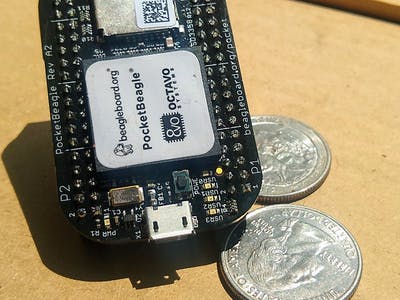
it’s not this adorable-looking puppy to the left. But rather this much more powerful, far more compact
open source Linux computer.
At the inexpensive price point of thirty five dollars, (available at the Adafruit website here:
https://www.adafruit.com/product/4179
) the PocketBeagle packs an
Octavo Systems OSD3358 1GHz ARM® Cortex-A8
with two
200-MHz microcontrollers
that use both
low-latency and real-time functions
to operate at a higher performance.
Only a micro-SD card is needed upon initial setup as all the storage and the primary image is stored there.
In total this key-fob sized Linux beast has
72 total pins.
44 of which are digital I/O pins and 8 being analog inputs,
As well as supporting multiple serial I/O protocols, used to control the communication series down a single channel and modulate when the receiver gets information..
I’ve seen the PocketBeagle quite a bit compared to the size of a quarter. I wouldn’t say this is the most accurate comparison. The processor, for all it’s amazing qualities, is more directly the size of a quarter making the entire Pocket Beagle just a bit bigger than two quarters or more comparable to an eraser..
so let’s get started..
Understanding the Pin Documentation
The pinout diagram can be intimidating at first, but the this diagram (above) shows exactly what the header pins do. Each pin has up to three-eight different functions shown so things can get a little overwhelming; However I’ve provided a detailed guide below to breakdown the color system and help you connect to the right places on board:
Red
– Power and system pins.
White
–
gpio
or General-purpose I/O pins:
Used for
receiving info and delivering data to connected devices (such as toggling an LED).
Blue
– USB or Universal Serial Bus pins:
Used for
plug-and-play interface between the PC and the peripherals.
Yellow
– Analog inputs: AIN/AI/ADC
Used to
moderate voltage levels into a digital value.
Brown
– UART serial pins:
Used for
asynchronous serial communication with configurable data format and transmission speeds.
Cyan/Light Blue
– PRU micro controller pins: (Unique to BB)
Used to
provide the real-time processing capability not found in Linux, including features such as a web server, WiFi, and Ethernet.
Magenta/Pink
– Battery pins
Purple
– I2C or Inter-Integrated Circuit Protocol bus:
Used for
multiple "slave" digital integrated chip to communicate with one or more "master" chip..
Light Green
– PWM or Pulse Width Modulation outputs.
Used for
communication with analog devices with a digital output and digital outputs to control an analog device.
Brown
– SPI or Serial Peripheral Interface:
Used for
sending data between micro controllers and small peripherals (shift registers, sensors, SD cards, etc.).
Dark Brown
– CAN or Controller Area Network Used for providing fast communication among micro controllers up to real-time requirements, eliminating needs for dual-ported RAM.
Gray
– QEP or Quadrature Encoder Pulse inputs: Used for the
eQEP
channels to interface with a hardware rotary controller.
The
dotted lines
in the diagram indicate the default pin functions or the default settings for anything not specifically named in the pin_config section such as driver strength.
PRU : The Powerhouse feature on the PocketBeagle
It is definitely worth investigating the Beagle’s
Programmable Real-Time Units.
There are two two 32-bit RISC micro controllers that are built into the processor.
(That’s that same less-than a quarter-sized processor)
These micro controllers operate separately from the processor, but still allow you to achieve time-critical operations such as bit-banging. The PRU itself is controlled through the
remoteproc framework
and contains a messaging library that allows for communication between the unit’s processor and the PRUs inside. This all grants the PRU to be extremely particular.
The PRUs features definitely make a statement on the overall performance of the board as it
eradicates issues like pipelining, branch delays, context switches, memory paging, interrupts, and scheduling
; There are problems typically that interfere with program execution and yield undesired results.
All captured in a complete Linux environment, the PRUs are programmed in C. However, this unit has a unique instruction set, which I found a bit difficult to pick up at first. The most helpful resource used was the
PRU Cookbook
found here:<
https://github.com/MarkAYoder/PRUCookbook>
, which after cloning on your Beagleboard device, you can go straight to running example code on your board.
Hands on:
Start yourself off with a SD Card.This needs to be no larger than 16GB. As the latest debian image sticks relatively small, but this is the size I obtained and is recommended by Beagleboard. Maneuver to
http://beagleboard.org/latest-images
and choose the recommended image. Make sure the image link includes the ‘PocketBeagle’ under the image’s intended devices. At the time of writing this I used the
Buster IoT (without graphical desktop) AM3358 Debian 10.3 2020-04-06 4GB SD IoT image
To write the image to your SD card, Beagleboard.org recommends a really simple SD Card writing software named
balenciaetcher.
I found
balenciaetcher
the easiest solution but rather slow.
Here are some alternatives if your computer does not support balenciaetcher or if you are looking for a more seamless option:
- UNetbootin (Windows/ macOS/Linux)
- Rufus (Windows 7 and later; fast)
- YUMI (Windows/ macOS/Linux)
Options for interaction:
First connecting to your Beagleboard: I found the simplest way to accomplish this was directly connecting the PocketBeagle to my laptop via microUSB. For a Windows machine, the IP address to connect to is 192.168.7.2. For Mac/ Linux it is 192.168.6.2.
Typing the direct IP address into an internet browser (that is not Internet Explorer) will direct you to the PocketBeagle 101 page
and allow acess to BoneScript, the Cloud9 Javascript IDE, etc. to start writing code inside your board.
Here’s some more great information available at this link from Beagleboard’s FAQ:
https://github.com/beagleboard/pocketbeagle/wiki/FAQ
Personally, I found Windows Putty as my choice to ssh directly to their board instead of the Cloud9 interface. THis was achieved by typing in the IP address into Putty rather than a browser and allowed ease in maneuvering through the Linux kernel. available below:
https://www.chiark.greenend.org.uk/~sgtatham/putty/latest.html
Extra and extremely considerable add-ons:
Beagleboard has some great capes available ranging from low end to high end from both beginners in Linux kernel programming and professionals alike.
Inexpensive Option: TechLab Cape
Amazing for beginners with a parts list consisting of two GPIO buttons, an I2C Accelerometer, a convenient light sensor, SPI 7-segment display, a PWM RGB LED, PRU Buzzer, and more.
Pictured below, it is a great start for someone just starting with the PocketBeagle and exploring the computer’s many capabilities including the all famous PRU.
Soldering will have to be done with this cape (along with risers). If you checkout the picture below this proved as one of my most difficult parts! Offers a great learning experience, it’s just something to consider before you buy
Beagleboard offers a in-depth look at each of the TechLab’s components on Github here:
https://github.com/beagleboard/pocketbeagle/wiki/TechLab-cape
High-End Option: Grove Cape/Grove Kit
A connection to Grove modules without the need for soldering or any loose wires, The Grove Kit offers a great option for exploring your PocketBeagle to all of its capabilities and beyond.
The GroveKit includes a PocketBeagle, Analog Microphone, Two chainable RGB LEDs, an Ultrasonic Distance Sensor, a rotary angle sensor, a slide potentiometer, two push buttons, a I2C 12 key touch sensor, a digital accelerometer, a speaker, 16×2 LCD screen, alligator cables, 16GB SD card and card reader, Wifi Dongle and adpaters/wires. Phew! GIves yourself quite a bit to work with is a sleek and compact box.
More information from Beagleboard’s site here:
https://beagleboard.org/Kits/Grove
Review and Conclusion
There’s no doubt the PocketBeagle is a low cost, slick design and simple use controller to satisfy all your high performance needs. Whether you decide to do grab some additional capes to learn the kernel/ some embedded Linux or start a personal project that needs an smaller computer inside of it, that can still perform real-time functions.
Comments are not currently available for this post.