Categories: Beginner
Visit my Github:
https://github.com/jas21RICE/ENGI301/tree/master/project_01
Background:
The goal of this project was to create an easy to make and easy to use musical instrument using a small PocketBeagle board. As a musician myself, I’ve always enjoyed finding music in the things around me and making music from whatever I can, but now I have managed to make the thing that makes the music!
Research
and
Planning
Before I could start developing the project, I first had to figure out what kinds of functions I wanted to see on the synthesizer. I drew some inspiration from a few other
Hackster.io
projects for features that I would implement:
▪
https://www.hackster.io/team-sunshine/keychain-synth-376159
▪
https://www.hackster.io/95016/keyboard-melodies-9ac4ab
▪
https://www.hackster.io/the-ohmonics/the-ohminator-analog-synthesizer-142dc7
▪
https://www.hackster.io/etiennedesportes/pocket-synthesizer-785b50
After I finished perusing through other projects for inspiration, I came up with a list of features that I wanted to see on the device:
1. Live sound, like any keyboard or piano
2. Multi-Octave support
3. Integrated Metronome
4. Recording/looped playback capability
With my basic functions defined, I began planning out the basic UI hardware that I would need to achieve each function. I decided that I would need three speakers, one for playback, one for live sound, and one for the metronome. I would need 12 push buttons for the keys of the synthesizer, and one more to clear the recorded music when a new recording is desired. Additionally, I would need four variable resistors, three for volume control and one for tempo control on the metronome. I also wanted two 4-Digit hex displays as well as an LED for the metronome. With a potential parts list decided upon, I created a mock-up of what the device would look like:
With my initial UI design laid out, I then began to plan out the pinning and power for each of my controls. Initial system and power block diagrams are shown below:
Soon after starting the development process, however, I found that I likely would not be able to implement all of the functions I had initially desired. I worked to get everything done that I could given my time frame, but ended up removing some features in the end. New system and power block diagrams for the device I actually ended up making are shown below:
With this new layout in mind, we can look at making the device!
Development
Process:
Live
Sound
I began by implementing the 12 note keyboard, as that was the central part of this project. I borrowed code from a friend (
https://www.hackster.io/nickericlester/ir-breakbeam-candy-dispenser-with-zelda-music-c76e65
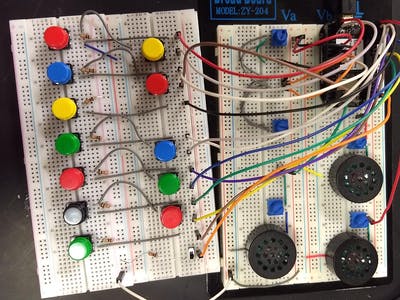
) to make a library of notes using the speakers I had gotten and to interact with the speakers to play notes. Once I had successfully set up the PWM pins on the PocketBeagle for the mini speakers and had successfully gotten them to play specified notes, I began wiring my 12 note keyboard:
The keyboard is powered by a single 3.3V_OUT pin on the PocketBeagle, and each of the buttons connects to a jumper that goes to a different GPIO pin on the PocketBeagle. In my code, I set each of the GPIO pins as inputs and labeled the pins for each note. Note that some of the buttons in the above picture are wired in parallel in order to share resistors in some cases. Through some experimentation, I found that the GPIO pins are configured to pull down by default, and made sure to write my code such that a note is played when the GPIO reads 1 (aka button press). With the keyboard setup, I moved on to the metronome
Metronome
The metronome setup was easy relative to the 12 note keyboard. I connected one of the speakers to a PWM pin on the PocketBeagle through a slide switch and a potentiometer and then to ground. The slide switch allows for the metronome to be turned off, and the potentiometer adjusts the volume by varying the voltage that the speaker receives.
Next for the metronome was the adjustable tempo. I connected the tempo knob to the PocketBeagle Analog pins (1.8V out, ref, in), and converted the analog reading to a tempo. The pocket beagle used that tempo to determine the timing of the metronome pings. In order for the metronome to run while the user played music, I setup second thread that ran the metronome in tandem with the main task, as well as the playback method.
Recording/Playback
The most difficult part of the project was figuring out how to record the notes that the user played and playing them back in a loop. The hardware was simple, 3.3V power through a 10kOhm resistor to a slide switch into a GPIO pin, and a speaker attached to a PWM pin along with a potentiometer for volume control.
The software, however, was more difficult. I decided to make a list of tuples that tracked whenever a button was pressed, noting 1) what note was pressed, 2) when the button was first pressed, and 3) when the button was released. Additionally, I had to create another thread to run the playback in simultaneously with the metronome and the main task. In the recording state (switch to the right for "write" hahaha) the main task creates an empty list and records the three characteristics listed above every time a key is pressed. When the key is released, the characteristics are appended to the end of the list. When the switch is switched to the left, the playback thread reads the recording file and plays each note in sequence, accounting for note lengths and rests between notes. It continues to loop the recording until the switch is switched back into the recording state.
Timbre
Adjustment
Although I didn’t get to implement every feature I had initially planned to, I did manage to add a small feature that I had not initially planned: timbre adjustment. Timbre is a term that describes the quality of a sound. For example, a trumpet and a guitar sound different even when they play the same note (frequency) at the same volume (amplitude/intensity), because they have different timbres. While timbre is much more difficult to quantify than frequency, I was able to adjust the timbre of the synthesizer slightly by changing the duty cycle of the PWM output to the speakers. To control this, I setup yet another potentiometer as an analog input into the PocketBeagle. I had the reading from that analog input pin convert to a value that changed the duty cycle of the PWM notes, effectively adjusting the timbre.
Operation
1)
Power up PocketBeagle, and run python3 script
2)
To record, flip the recording switch to the right
3)
Play notes
4)
To play back, flip the recording switch back to the left
5)
To turn on the metronome, flip the metronome switch to the right
6)
Set tempo using the potentiometer left of the switch
7)
Adjust speaker volumes using potentiometers next to each individual speaker
8)
Adjust timbre using far left potentiometer
Video:
Future
Work:
- Design a housing for the device that would make it more portable and easier to use
- Implement functions that I had initially wanted to do
- Wiring/space optimization to make the device smaller overall
- Implementation of more recording channels to allow for more complicated music composition
- Improve on functionality of playback feature to make it more user friendly
Special thanks to my professor Erik Welsh (
https://www.hackster.io/welsh
) for all of the help that he has provided on this project.
Comments are not currently available for this post.