Categories: Advanced
Concerned about IoT privacy on the cloud? The
Blynk
solution offers an interesting option for improved security with a local server.
I tested it with the following configuration:
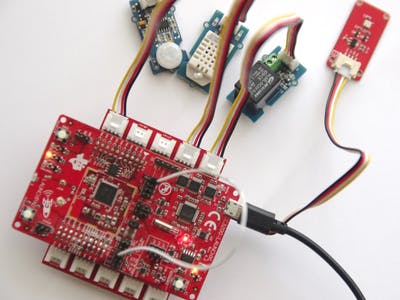
The LaunchPad TM4C123 programmed with Energia performs the
data acquisition
with the Grove BoosterPack and the same sensors as in the
Weather and Security Station with Blynk
. Connection to the server is done through WiFi with the CC3100 WiFi BoosterPack.
- A BeagleBone White running on Debian hosts the
server
, with Blynk server release 0.8.0,
- The Blynk version 1.0 RC7 for Android
displays
the data on a Slate 7 Plus tablet from Hewlett Packard running on Android 4.2.2 .
Prepare the Hardware
As for the project
Weather and Security Station with Blynk
, the hardware includes a LaunchPad CC3200 and a Grove BoosterPack with 4 elements:
- a PIR detector (input pin 27),
- a DHT22 temperature and humidity sensor (input pin 24),
- a BMP180 pressure sensor (I²C port) and
- a relay (output pin 23).
The Grove system makes connections very easy. Just plug and play!
Configure the Server
The server is hosted in a BeagleBone, connected through Ethernet to a WiFi router.
$

 java -version

 java version "1.8.0_60"

 Java(TM) SE Runtime Environment (build 1.8.0_60-b27)

 Java HotSpot(TM) 64-Bit Server VM (build 25.60-b23, mixed mode)
- First install Java 8 following this
procedure
# apt-get install oracle-java8-installer
- Second, create a Blynk folder and install the Blynk server
# mkdir ~/Blynk# wget https://github.com/blynkkk/blynk-server/releases/download/v0.8.0/server-0.8.0.jar
- Third and finally, launch the server and note the IP address of the BeagleBone.
# cd ~/Blynk

# java -jar server-0.8.0.jar -dataFolder ~/Blynk &
Open the Blynk Application
Connecting the Blynk application to the server was the tricky part. I wasn’t able to connect to the server directly from the application. d>
The procedure should have been:
- On the main screen, select the server to connect to.
- On the Server Settings, select
Custom
and enter the IP Address of the server. - Press
OK
to return to the main screen. - Press
Create Account
and enter the credentials.
The credentials consist on an e-mail address with a
@
and a . like in name@mail.com, and a non-empty password. Both are compulsory. Otherwise, the app displays a cryptic message.This last part didn’t work for me. I reported the bug and Blynk is working on an fix.
As an option, Blynk provides a
client to emulate a smartphone
, with handy commands to create and configure a client.
- First, check Java 8 is installed. If required, download and install it.
$

 java -version

 java version "1.8.0_60"

 Java(TM) SE Runtime Environment (build 1.8.0_60-b27)

 Java HotSpot(TM) 64-Bit Server VM (build 25.60-b23, mixed mode)
- Second, download the client.
$ wget https://github.com/blynkkk/blynk-server/releases/download/v0.8.0/client-0.8.0.jar
- Third, launch the client. 192.168.1.26 is the IP address of the BeagleBone and 8443 is the default port of the Blynk server.
$ /usr/bin/java -jar client-0.8.0.jar -mode app -host 192.168.1.26 -port 8443
- Finally, create the user, a dashboard and note the authentication string, like "1a2b3c4d5e6f7g8h9i0j1k2l3m4n5o6p".
register name@mail.com password

login name@mail.com password

saveProfile {"dashBoards":[{"id":1, "name":"Local Weather", "boardType":"LaunchPad CC3200"}]}

getToken 1

activate 1
Back to the tablet,
Launch the Blynk application and select
Log In
.
- Proceed as before for selecting the server and entering the IP address of the BeagleBone.
Type in the credentials name@mail.com and password, and press the
Log In
button.
- Blynk grants access and shows the empty dashboard previously created with the client.
Adapt the Sketch
Just edit the
Blynk.begin()
and add the IP address of the server.
Conclusion
The Blynk sever offers many
more options
, as
e-mail
, debug log level, number of users,
data storage
,
SSL certificates
. Contrary to other options like
Phant used by Sparkfun Data
, there’s no need to stop Apache.
The only difficult part was the configuration process, which is being fixed. The forum was of great help on solving this issue.
The Blynk server offers a very interesting solution for private cloud, from start to finish.
- Pros:
Private cloud,
Data retention - Cons:
Connection to the server from the Blynk application not as easy as expected - Wrap-Up:
Very interesting solution for private cloud,
Highly recommended
Links
- Blynk server
download and documentation
- Blynk
website
Comments are not currently available for this post.