Categories: Intermediate
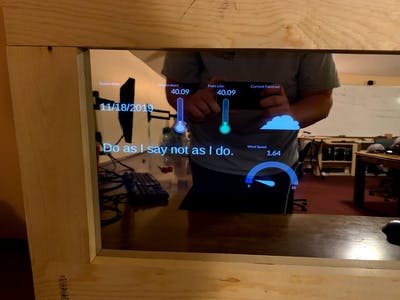
This project consists of a reflective pane of acrylic with a monitor behind it, creating a mirror that can display useful widgets like the date, the weather, and a daily fortune, among other things. It is a sleek device useful for quickly gathering daily information while, for instance, getting dressed or brushing teeth.
Building the Mirror Enclosure
Once all supplies are purchased, we can start to determine dimensions and design of the frame itself. For our project, we used a mirror that was 1ft by 2ft in size, while this is not very large, we felt like it was a good start. The frame itself actually measures 18.5" by 30.5" on the outermost dimensions. There are few things to take into consideration with the outer frame:
- Making
the
Mirror
Fit:
The easiest way to get the mirror to sit within the frame is to account for a small amount of the mirror to sit behind the frame. Our frame is designed to be half of an inch short in the horizontal and vertical length. This means that a quarter of an inch is overhung holding the mirror in place - Make It
P
retty:
While our project may not look that pretty, it is very easy to make this mirror look like one you can buy off the shelf. Rather than using normal 1×4’s for the outer frame, you can use molding to add more flair. Stain and paint are two other options to spice up the look of the mirror.
Build the Outer Frame:
To build the frame, you are going to need two boards at the shorter length and two at the longer length. So for ours, we needed two boards at 18.5" and two at 30.5". It is important to remember that if you are going to angle the edges rather than having straight connections, use the small length as the starting point of the 45 degree cut. So when cutting the 18.5" board, you are going to want to measure 11.5" between the two angles as the extra 7" account for the width of the long boards. Here is a picture of the back of our frame. We both glued these corners and used corner brackets to make the edges more secure.
Building the Back Housing:
Once you have the outer frame complete, you then must start on the back housing. This is what is going to hold the mirror in place as well as the monitor and BeagleBone. To construct this piece, you need to know the dimensions of the mirror. For ours, we know that the inside dimensions of the frame needed to be 12" by 24". This means that we cut two boards at 12" and two boards at 25" to account for the thickness of the boards. These boards are attached at the corners with wood screws and built around the mirror to ensure that we had everything fitting correctly. Here is a picture of our back enclosure, note that we notched out a hole to leave room for the power cord.
Attaching the Two Parts:
Now that these two are complete, using the mirror we can align the back housing and attach it to the frame. Here we used more corner brackets to attach the back housing. This allows for a screw free front side. See the picture below, note, make sure to install the power adapter before screwing down the back housing.
Make sure Everything Fits:
Once these are nicely attached, it is time to do a test fit. Before we install the mirror, we added a black backing to the mirror in all of the parts that we did not want to have light shine through. This mirror we used had the potential to become opaque with back ground light, so we added this backing to everywhere except where our dashboard will display. This backing was made with a piece of black construction paper attached to the mirror with two sided tape. Install the mirror into the frame, add the monitor, power strip, and make sure to add another board that holds the monitor in place. This board should be cut to the inner dimensions of the back housing. One important thing to note is that to make for a less heavy mirror, it is advised to remove the housing from the monitor. By leaving this in, we left a lot of extra weight within our mirror. See our test fit below.
Put Everything Together:
Now that we have had a successful test fit, we noted a few things that we needed to add. When it comes to securing the monitor, we only have it secured on one side. There is a small gap on the right side in the picture above between the monitor and the back housing. To fix this issue, we added a small piece of 1×4 in-between the monitor and housing. We also needed to make sure that the monitor did not fall out of the back housing. To do this, we used some left over strips of 3/4" plywood attached to a piece of 1×4 that spans the back of the mirror. These plywood strips are attached to the outside of the back housing using wood screws. We also noted that we needed a notch in the board being used to secure the monitor to pass cables between our power section and our monitor section. Once we added the notch using a jigsaw, we ran the cables through and attached it to the back housing using wood screws. View our completed back panel in the image below.
Assembling the Code
Our project utilizes Initial State’s online dashboards. This site is very easy to work with and allows students to register a free account with their student emails. Initial State also has many different examples and documentation that makes start up very easy. Along with Initial State, we used DarkSky’s API and the Fortune Cookie API. The code behind the project can be found at this
repository.
After pulling the code from the repository, there will be some changes that each user will need to make to customize this project.
- Initial State Authorization Codes:
This is a very important part, in order to make sure that each user is able to control their own smart mirror, they must change their authorization codes. For Initial State, each user must not only change the
ACCESS_KEY
variable to the access key given from Initial State, but they must also change
BUCKET_KEY
variable as it determines the dashboard to use. These can be found under the settings of a specific dashboard on Initial State’s web page. - DarkSky Authorization Codes:
In order to get accurate weather data, our project utilizes DarkSky’s API which has its own authorization code. The variable,
DARK_SKY_API
, needs to be updated the the users authorization code from DarkSky. When changing this, the user should also make sure that they update the
COORDINATES
variable to match their location coordinates. The ones currently found in the repository are for Terre Haute, IN. - Blynk Authorization Code:
The final authorization code that the user must update is Blynk’s authorization code. This project utilizes Blynk to turn the monitor on and off when the smart mirror is not in use to give the full mirror use.The Blynk setup can be found
here
and from there the user can get their specific authorization code. Once found, update the BLYNK_AUTH variable. - Installing Necessary Libraries:
The cloned repository contains a install.sh file, this file will run the commands to install the necessary libraries and utilities that are used within the code. Once inside the directory, this can be run in the following way:
./install.sh
Once these are completed, the code can be run by either selecting the
smart_mirror_main.py
file from the file explorer or typing the following command into the terminal.
./smart_mirror_main.py
Blynk Setup
Like mentioned above, this project uses Blynk to turn the monitor on and off. Blynk provides great documentation for getting started within the app. These instructions can be found
here
. Once the user has Blynk up and running, our project uses one button, which is set as a switch with a virtual pin of V0. The labels have been renamed to be on and off to correspond with the status of the monitor. Once the code is up and running, hit the play button in the top right to connect the app to the code.
Customizing the Mirror
The user now has an up and running smart mirror. From here, they can choose to customize their dashboard however they please. If a user wanted to add a new tile with different information, they would just need to add a line, like the one seen below, in the
stream_data()
function with the desired information. The first argument is the title of the new tile that will be created and the second argument is the data to be displayed in the tile. In the line below, the data that is being sent is the current date.
streamer.log("Today's Date",current_date)
Wrapping it all up
Here are some extra pictures of our design and final product.
Comments are not currently available for this post.