Categories: Beginner
Hello,
I finally in April 2020 got this Drone, w/ BBBlue as the brains, to fly and work. Please be patient as a video will be arriving soon after this day, 4/10/2020.
Here is an update on mechanisms and ideas:
Well…it only took two years! But…it is completed. There was a large learning curve for me on this project as I had not messed w/ 3-phase motors nor have I ever made a drone. So, in hindsight, I should have read more on the subjects and then proceeded. Anyway, the project is completed and the BBBlue flies again!
…
Now, the first things are done by purchasing. I will not provide a BOM b/c the transmitter, receiver, and frame are all up to you but what I used works and has been known to work w/ the BBBlue from beagleboard.org.
Okay. So, here I go.
…
After purchasing your specific hardware, we need to set up the software and make attachments.
You can listen to this page directly for software:
https://github.com/imfatant/test.
This cures the long description I have not included. Also, if you want an updated image made by beagleboard.org, please view this updated link:
https://elinux.org/Beagleboard:Latest-images-testing
or go to their website and find the latest-images section for the most current images. Enjoy!
…
But…for the FrSky X-Lite and X8R receiver, the binding process eluded me for an entire year. I was unfamiliar w/ how the instructions were stating what I needed to do. I found a nice person online that specializes in this type of specific ideas. This person likes drones, flying, and helping other people.
So, the binding process for the X-Lite to the X8R goes like this:
Put an object on the receiver on the F/S button, hold it down, and while in bind mode on your transmitter (the X-Lite), add power to both (turn them on).
…
I know that sounds easy but there was a lack of initial ideas circulating b/c of this transmitter being new at the time. Anyway, that should bind your transmitter and receiver.
…
If you need extra help for this binding process, please view ideas online.
Here:
So, now…
We need to attach everything, put the frame together, and turn things on.
The BBBlue uses a 2S LiPo three wire plug to power it while powering it from a S2 LiPo. Do not use a 3S LiPo on the BBBlue. You will damage your board or yourself.
So, now…
We should have compiled the source from imfatant’s repo. online at github on the BBBlue, put our frame together, and the transmitter and receiver should have be bound together.
For connections to your FrSky receiver and the 4-in-1 ESC, attach the signal wires from your ESC to the receiver. Then, attach GND from the ESC to the GND pin on your receiver.
Okay so…now:
http://ardupilot.org/copter/docs/connect-escs-and-motors.html.
This site page shows you how to understand the Clockwise and Counter-Clockwise rotation of your particular craft. Drones! Please remember if you show that there is a notation on your 4-in-1 ESC, use them for calculating where exactly your motors belong on your Drone. Left-front, right-front, left-back, and right-back are all positions on a four propeller Drone in the HexaCopter position. Use the info. in front of you, your schematics if you have drawn any out, and look up what you do not understand if you get confused on any subject matter.
…
Now, use that packet of wires, the JST-SH wire set up, cut all of the wires except for the one in this photo:
See the four pin JST-SH connector and how all wires except for the far left PRU in pin has been snipped.
…
Now, we need to attach, from our receiver, the Sbus signal pin to this PRU in pin on the BBBlue by way of a wire. So, solder yourself a makeshift wiring.
…
Now, we also need to put power to the receiver by way of the servo header on the BBBlue. During the software install from the imfatant/test repo on github, there was a section that described how we apply power to the servo header on the BBBlue.
So, now…
We should have a working model of a complete frame, a set up of software for the ArduPilot (ArduCopter) source, and a couple of turning motors.
Please remember while testing to
not
put your copter blades on until you are ready in a remote location to fly. Testing w/ the blades on can cause serious injury and/or loss of vision. Serious.
Seth
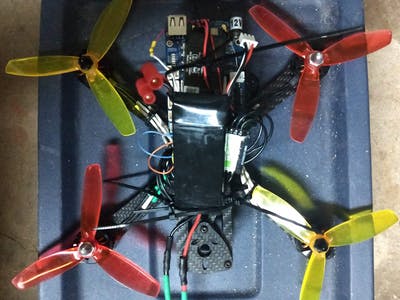
P.S. Oh and please view this nice photo of the BBBlue and the capabilities it holds:
…
Okay…if everything was set up correctly, the aerial bot should be moving and "slicing/dicing" throughout the air. If not, use this diagram for info. on setting up propellers on your specific motors:
https://ardupilot.org/copter/docs/connect-escs-and-motors.html
is the website where I gathered this info. and I posted a photo from that specific website.
One last thing…
Make sure each of your motors are not turning in the same direction. So, if you use four motors, two should be turning in a CounterClockWise motion while the other two should be spinning in a ClockWise direction!
Additions:
GPSMission_PlannerBuilds_From_The_ArduPilot_Wiki
Building:
Please be patient as I have some work to do on this project…
Comments are not currently available for this post.