Categories: Beginner, PocketBeagle, Robotics
Introduction:
Deciding what to build was difficult since there were so many cool possibilities out there and I’d never really done anything like this before so I didn’t really know what would be too much or too little. Eventually, I decided that I wanted to build a remote controlled car since I’ve always been pretty into those toys as a kid. I also found
this hackster.io
post of someone that had already made a bluetooth controlled car which gave me confidence that I could do it too. However, I thought a normal remote controlled car would be kinda boring so I came up with the idea to have it be controlled through speech commands. In theory, this car would simply listen and wait for you to say commands such as “forward”, “backward”, “left, “right” or “stop” and would then do whatever you said. The actual result isn’t quite that neat and tidy unfortunately but we’ll get to that later.
Build Instructions:
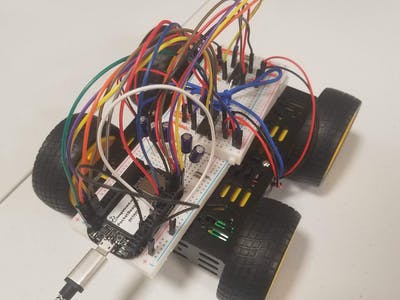
First things first, lets build us a car! If you buy the same kit that I did (listed above in the components sections), this’ll be super straightforward. Simply follow the instructions provided in the box and you should have car no problem. Don’t bother attaching the battery holder provided. I would recommend routing the wires from the motor out of some of the holes in the side though, just for easier attaching later. This is pretty much the only real hardware thing you have to do for this project so good work!
Next, lets work on the electronics. If you follow the fritzing diagram provided below, this should be fairly straightforward as well.
For clarity, the GPIO pins P2_2, P2_4, and P2_6 go to the motor driver connected to the top left motor in the diagram (which I made the front left motor on my car), P2_5, P2_7, and P2_8 go to the motor driver connected to the bottom left motor in the diagram (the front right motor on my car), P1_33, P1_35, and P1_36 go to the motor driver connected to the top right motor in the diagram (the back left motor on my car), and finally, the P1_30, P1_32, and P1_34 go to the motor driver connected to the bottom right motor in the diagram (the back right motor on my car). For more details on the motor drivers themselves and why things are connected the way that they are, taking a look at the datasheet for those drivers (especially the page on pin configurations and functions) will help a lot. The five 100 μF capacitors are connected to the Vin on the PocketBeagle and this helps because those motors can be quite hungry so especially when connected to the computer and testing, sometimes the motors will try to draw more power than the usb connect can/will provide meaning that the PocketBeagle will just straight-up disconnect from your computer which can be quite frustrating when trying to test whether your car is working or not. The capacitors aren’t perfect and it will still disconnect sometimes but its better than nothing.
The last thing you will need to do is the code. All of the code can be found in the github repository linked below. The way that this works is all fairly simple. There are 2 main files, motor_control.py and speech.py.
The first does exactly what it says, it controls the motors and contains functions which, when called, will send signals to the motors so that the car will either move forward, backward, turn left, turn right, or stop moving. Both the move forward and backward functions are also written so that it will only move for 2 seconds before stopping. The turn functions work by turning the wheels on one side of the car in one direction and the wheels on the other side in the opposite direction. In theory, they are set so that the car will turn 90° in whichever direction specified but since it’s controlled purely by the amount of time that the motors are on, this isn’t always super consistent, it can vary depending on how much weight is on the car and the surface it is driving on.
The second works by using the SpeechRecognition python package. For details on how exactly to get started and use this package, I relied heavily on and would recommend
this tutorial
. Once you understand that tutorial, it should be pretty clear exactly what’s happening in my code since I am pretty much doing exactly what it suggests. Unfortunately, as you will be able to see in my code, I am not actually using any microphone input since despite my best efforts, I could not get the microphone to actually record any input. Instead, I recorded myself saying the various commands and set it up so that it will recognize the speech from those files and do what it says. (These wav files of my commands are also available in the repository if you need it.) However, if you can manage to get your microphone working, it should be fairly simple to follow the above tutorial and use the microphone as the input.
Other than those two main files, the github repository also contains config_pins.sh which sets all the pins used to be GPIO on the PocketBeagle and which needs to be run every time the PocketBeagle is powered on, the run script which will do exactly that, call the config_pins.sh shell script before calling speech to do its thing, and a test_motors.py script where you can test each motor so that you can make sure you’ve wired everything up properly and that the motors spin in the direction you want them to.
Future work:
By far, my biggest issue was to get the microphone working. To take this project further, I’d want the microphone input issue to be fixed so that you could actually give the car real-time commands. When I was playing around with the speech-to-text capabilities of SpeechRecognition though, I also realized that it is slow and not always super accurate. Even for a 1 second clip of me simply saying “forward”, it can take > 10 seconds to fully process and output the result (this can be seen in the video of the car working below, the commands given in the script are: forward, right, forward, left, forward, left, backward). Plus, it took multiple attempts of me recording myself saying some of these commands before the api would output the correct text. Of course, in real life, when the clips are inevitably longer and there is other background noise, this would probably be even more problematic. There are a couple possible solutions to this that I can think of. First, is that for this project, I was using the PocketSphinx api through SpeechRecognition since that was the only one of the 7 available that works offline. If you could get the device connected to the internet when in use, you could use a different, and possibly more accurate/faster api. Alternatively, (and this would also help with the microphone input issue) you could do away with using the SpeechRecognition package entirely and connect the PocketBeagle to the internet and use something like the Alexa Voice Service (AVS) which amazon provides APIs for and could potentially allow you to send “events” to the PocketBeagle prompting it to move based on your voice commands which Alexa processes. I’ve never actually done anything like that before so I’m not completely sure whether that would be easier or more accurate/faster but based on some other projects that I have seen take advantage of that, it may well be worth a shot.
Comments are not currently available for this post.