Categories: Intermediate
Github link: https://github.com/anhhoangvu/ENGI301/tree/master/Project%20I
The project was started with 2 big goals:
1. Replicate the metronome with vibrations instead of sound in a wearable device.
2. The device should also react to surrounding sound.
Breadboard prototyping
With the two goals in mind, initial components are obtained and prototyped on a breadboard for proof of concept as shown below. The LCD is controlled using I2C protocol. The RBG LED is driven by 3 GPIO pins (one for each color) connected to 1k Ohms resistors and a common 3.3V. The button is a micro roller button with standard contact when pressed between the middle pin and either corner pin. The microphone’s 3.5 mm jack is connected to an audio converter with a usb connection, which is subsequently converted into a microusb breakout board. All the components are controlled by the PocketBeagle.
Software Prototyping
The prototype is then tested by directly connecting the set up to a laptop and upload the code (shown below).
In general, audio input is obtained from the microphone using alsaaudio (helpful post:
https://stackoverflow.com/questions/6867675/audio-recording-in-python)
The audio is then very crudely analyzed using a real fast fourier transform (
https://docs.scipy.org/doc/numpy/reference/routines.fft.html
) to be separate into the low, mid and high frequencies band to be reflected by the 3 colors of the LED.
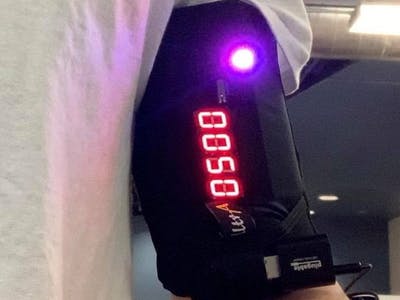
Assembly into final device
After confirming the software perform as expected, the circuits are assimilated into an elastic armband. The armband has a pocket that can store the hardware, about the size of a phone.
Everything is then stuffed inside the pocket of the armband and worn on the bicep. A pocket knife is then used to make some cut in the arm band to free the screen, button, LED and connection for the microphone and power outlet. The final assembled product can be shown below.
Future Directions
There are two main concerns with the current device
1. The device is not autobootable when alsaaudio is used. crontab is used but only works when the audio portion of the code is commented out. Future work is needed to get the device to work properly.
2. The LED is not very responsive to the surrounding sound yet. There are detectable changes but the changes are very minimal. Alsamixer should be explore for a high level sound detecting mechanism instead of analyzing the sound using only fourier transform.
Comments are not currently available for this post.